As with any other design, electrical design begins with your requirements. Lighting requirements, which I discussed in a previous post, will dictate the locations and types of switches and circuits. But one also must consider the other electrical needs of the house. This includes electrical outlets, appliances, HVAC (Heating, Ventilation, and Air Conditioning), and specialty circuits such as an electric car charger or a stair elevator. When considering the electrical requirements of my remodel, I also wanted some room for future expansion to take care of needs that aren’t yet specified. In an older home, this typically means that you’ll have to upgrade the service going into the house. More on that in a bit. Here is the list of requirements that I came up with for my remodel.
- Significantly expanded permanent lighting to be controlled with switches from convenient places.
- Additional outlets for the den (entertainment center) and kitchen.
- Dual electric car chargers.
- Air conditioning system.
- Additional outlets in garage to support a smart home wiring closet
Now at this point of the design, we start to get on thin ice when it comes to a DIY job. You will have to start making design decisions and tradeoffs which are going to be influenced by code requirements, and unless you have some background and experience with electrical design and code requirements, it might be a good idea to enlist the help of a professional. In my case, I have an engineering degree, so I have a good handle on basic electrical design and circuits. In addition, I have several years of experience from the Navy as an electrical officer and engineer officer, so I have a lot of practical experience with electrical systems including power generation, distribution, control, and most importantly: SAFETY!! This is why I caution anybody who does NOT have experience with electrical systems to get professional help sooner rather than later. Electricity can kill you and can burn your house down, so you’d better be sure you know what you’re doing. With this in mind, I started with a focused study of the California Electrical Code, which is basically a reprint of the National Electrical Code (NEC). There are also a lot of “how-to’s” on the Internet, and there are a lot of forums where you can pick up some good tips that help demystify the arcane language of the NEC. One site, which is particularly geared to the DIY enthusiast, is Wire Your Own House. The guy who writes this is a professional electrician, and his website is chock full of good information. Turns out that there are a lot of professional tradespersons who freely share their techniques and knowledge. If you really want an education on how to do things like a professional, YouTube is a great resource. Consider it your apprenticeship program! Now, armed with knowledge, I was ready for the next step. As in every other remodeling project, the first place to start is figuring out what you’ve got. So I went to my service panel and methodically turned off one circuit after another and with multimeter in hand, recorded every switch, receptacle, and appliance, and matched all of those to my the individual breakers in the service panel. Needless to say, I found some problems.
- The service panel was woefully inadequate for what I had planned. It was a 100A service and it was maxed out. I knew I needed more than that. Wasn’t sure how much yet because I hadn’t completed the design, but I knew there was no room for expansion.
- Some circuits were not per code. I had a massive amount of lights and receptacles on one circuit, and it looked like it was messed with by the previous owner of the house. My adding some “extensions” to the circuit didn’t help much.
- I didn’t know what I was doing. What did I say before? If you’re not in the business then be VERY CAREFUL. Turns out that I made several code mistakes, like powering kitchen lights with dedicated small appliance circuits (a no-no) and extending lighting circuits with junction boxes buried under drywall (safety hazard — and not per code). However now that I know the code better, I’m going to right these wrongs. Plus, my design has to get approved by the building department, so they will provide an independent check. PLUS — I’m going to hire a consultant to check any work I end up doing myself. I may be smart, but I don’t know everything, and an independent look is well worth it.
Sidebar: a couple of months after I accomplished the “as installed” conditions, I had an electrical fire. No kidding! The dryer breaker fried. So I pulled apart the dryer to make sure that the heating element was OK, and it was fine. I then went back into the distribution panel, and lo and behold, the 240V wiring from the dryer in the panel had shorted out. You know, the one with the red insulation on it? Upon further inspection, I found out that there were knife cuts in the insulation, probably from stripping the outer plastic sheathing on the Romex during the original assembly. So, I put some heat shrink on the offending conductors, and clipped the blasted out wire so that I had a good solid wire to work with, and put in a new dryer breaker, the original one being a slag heap. Moral of the story: Even the professionals get it wrong on occasion! If I needed another reason to get a new distribution panel, this was a good one.
Now that I had the “as installed” configuration, I could start to work on the remodel. I went back to my design requirements and placed all of the lights, receptacles, and switches where I wanted them on the plan, and then mapped those to the existing circuits, making new circuits where necessary. Also, to be code compliant, I had to consider not only the numbers and types of circuits, but also which ones were Ground Fault Circuit Interruption (GFCI), but also Arc Fault Circuit Interruption (AFCI). AFCI is used to help prevent fires by detecting the spark (arc fault) that occurs between two conductors that short out (such as with a faulty lamp cord). Those are required in living areas such as living rooms, dens, and bedrooms. Basically, if you want to be up to code, you’re either going to have a GFCI or an AFCI breaker in your distribution panel. Not so many “standard” breakers anymore! Lastly, now that the circuit design was done, I had to calculate the loads to figure out what service I needed. The code can be pretty arcane when it comes to figuring out what you really need. Fortunately, there are some great resources on the Internet, the best one was from a website (“Electrical Knowhow“) where you can find a handy-dandy spreadsheet(ResidentialLoadCalculations) where you put in your numbers and it figures out what you need based on the code. BUT…you REALLY need to understand what goes into that spreadsheet and why it produces the numbers that it does! I referred back to the code at every step to make sure that I was putting in the correct numbers and that the results were code compliant. To sum up my diatribe on electrical design, allow me to leave you with these thoughts:
- Approach the design with the same top-down method that all designers use. Start with your requirements and work down, making sure that the design meets those requirements as you get increasingly detailed.
- Use the DIY approach to detail the design within the limits of your knowledge and experience. It’s OK to stretch a bit as long as you’re willing to invest the time and effort to self-educate. Even if you never get to the point where you finish the design, or do any of the work, the time you spend in learning the details will pay off when you hire a professional.
- Have humility. Don’t pretend to know-it-all and, if you’re doing this as DIY all the way, at least have the common sense to hire a consultant to check your work. The stakes are too high.
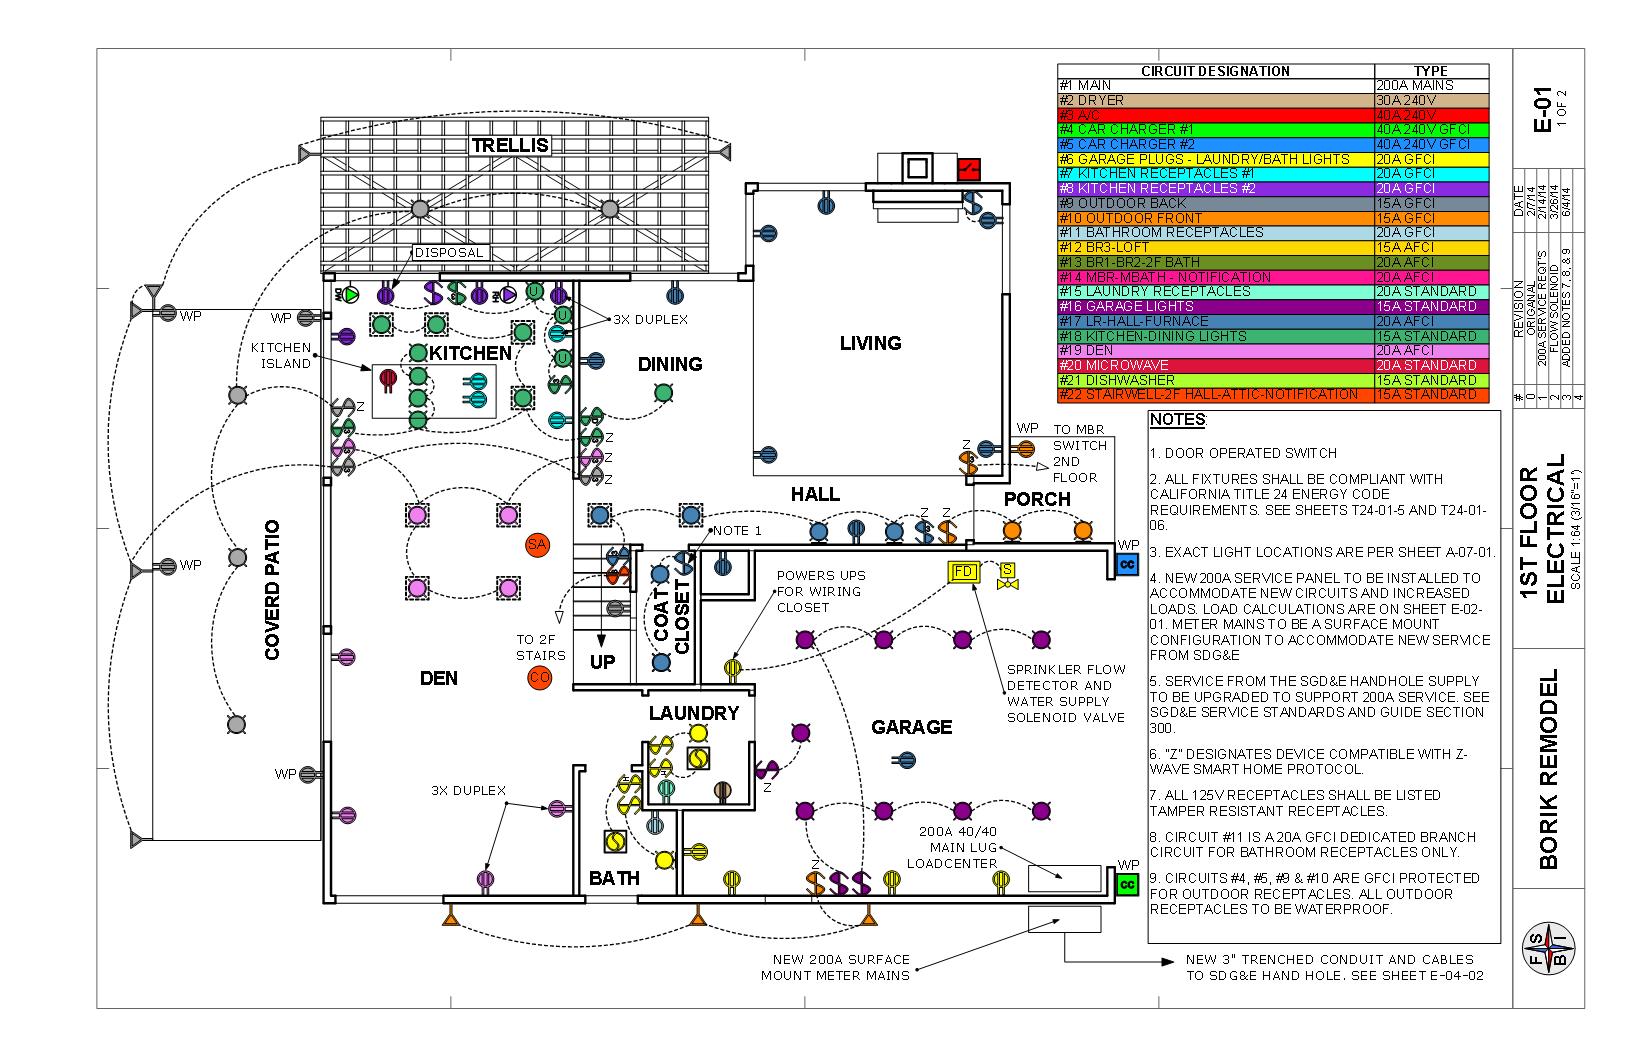
ELECTRICAL DESIGN FIRST FLOOR
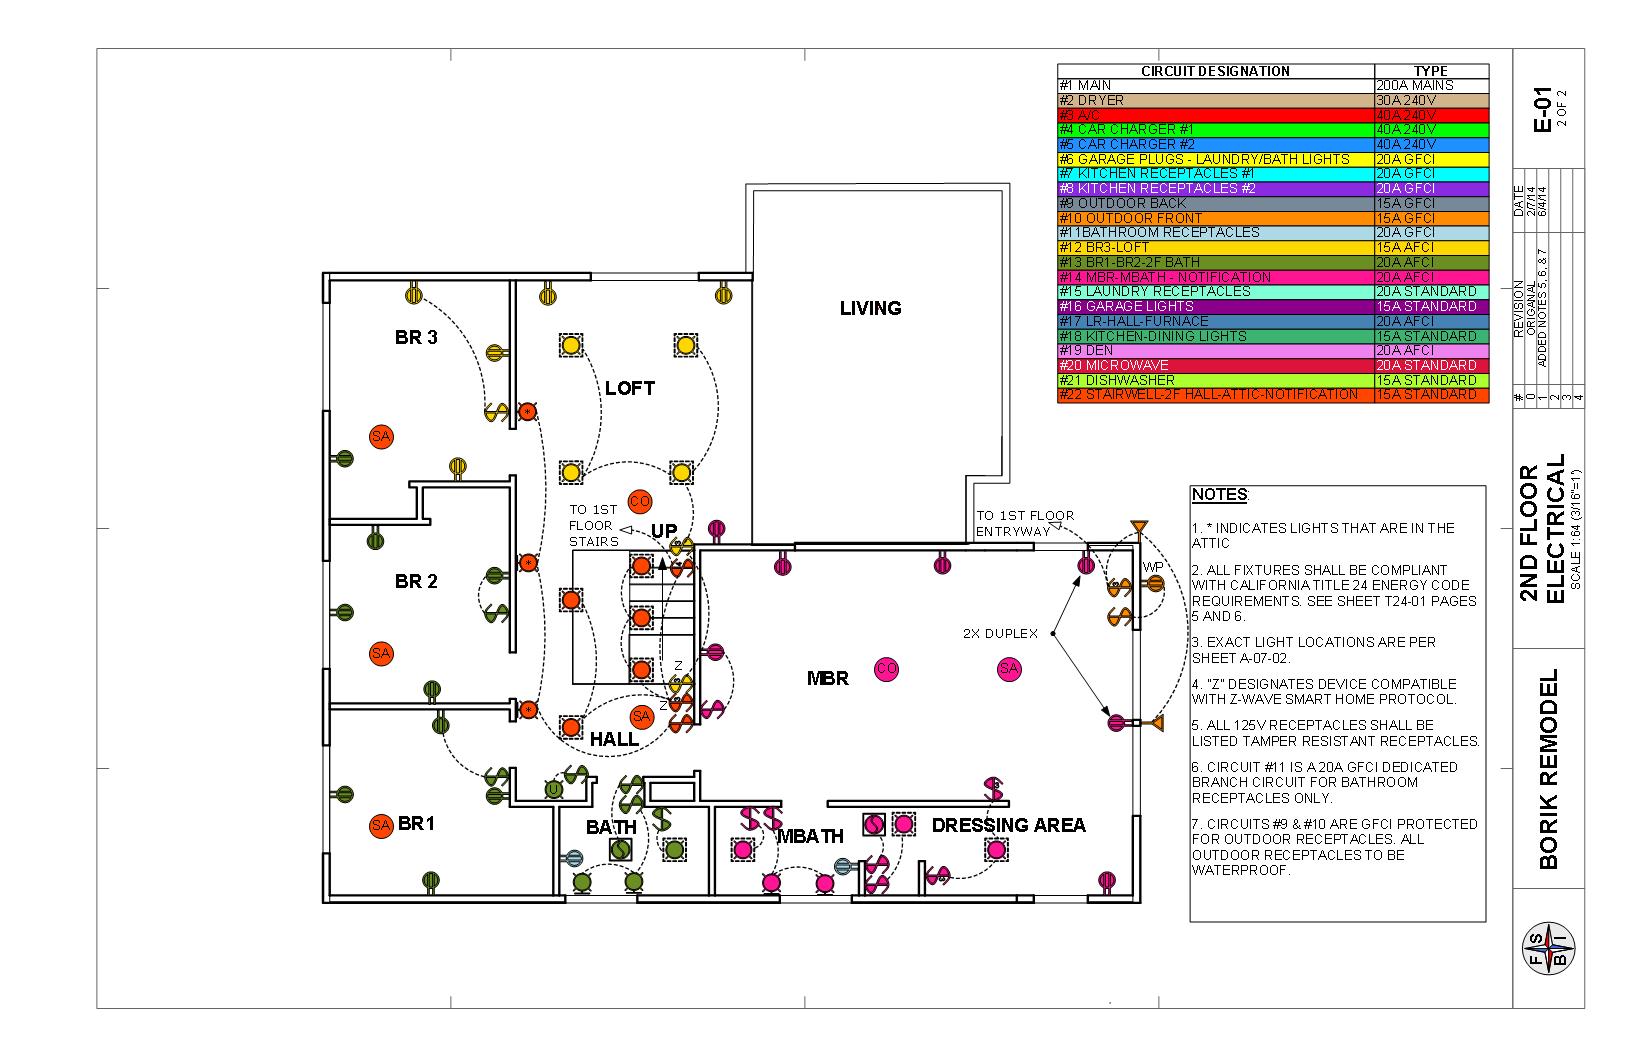
ELECTRICAL DESIGN SECOND FLOOR
Here is my final electrical design.
