In my last post, I mentioned all of the “Christmas” shopping I did in getting all of the parts for my buried services. I’m deep into digging (more on that later), and I actually am looking forward to spending some dedicated time over the Christmas and New Years holiday to make some really good progress.
As usual after Thanksgiving, our neighbors decorated their homes with lights, and it really makes the street look nice. We would always participate, putting up some tasteful white lights and some garlands. In fact, my remodeling plans call for an exterior plug, controlled by a switch, that will be installed expressly for Christmas lights.
But that is in the future, and for now, I felt I had to come up with something that was appropriate for the season, yet fit our “decor” of a torn up yard, complete with piles of dirt and trenches. Honestly, the exterior of the house and property will look no worse than it does at the moment. What a friggin’ mess! Then, in a flash of insight, I had the answer!
My lovely wife always encourages me to “use what I have”. I think this comes from her Scottish heritage, and I appreciate and admire her way of making elegance out of frugality. In rising to that challenge, I took a look at these traffic barriers that I had, and it gave me an idea. I was required to buy traffic barriers with flashing lights for the dumpster(s) that I needed to put on the street, marking where the dumpster was, lest an errant driver not see it and run into it at night. I swear that the drivers around here are so fu#&*@’n dumb that they don’t need any assistance from alcohol to run into a dumpster in broad daylight. And swear I do. Profusely. When I’m driving.
Back to the point. These traffic barriers have flashing lights. And, I have my strings of Martha Stewart LED outdoor Christmas lights. AND I have a bunch of “CAUTION” tape. What a great combination! So, I placed the traffic barriers in a tasteful manner across the front of my yard, strung my Martha Stewart lights tastefully between them, secured the assembly with tasteful CAUTION tape, and put the lights on a timer that I had from my (now defunct) pond. This arrangement has the added advantage of discouraging errant people on the adjacent sidewalk from stumbling onto my property and breaking their legs when they trip into one of the many trenches that await their drunken follies. (OK, they have to be drunk, but that is not outside the realm of possibilities.)
Although I try to elicit visual pictures with my writing, this video is worth 454 words. Good thing this blog has a word counter, otherwise I’d be guilty of false representation! (OK that’s 472 words).
Everyone have a wonderful holiday season, and I promise I’ll have more posts in the near future.
As I was in the later stages of planning, and after the home inspector I hired pointed out that I needed to install a proper drainage system in my yard, I came to the realization that I would have to move a LOT of dirt. In a previous blog entry, I mentioned the fact that I rented a “skid steer” (or Bobcat) to do the demolition of my concrete and retaining walls. Now, with another long weekend at hand, it was time to rent the beast again and do some real digging.
I remember from my childhood an interest in heavy machinery doing all kinds of excavation and grading on a miniature scale in my sandbox. With my Tonka Toy grader and bulldozer, I was digging awesome ditches and making the grade so smooth that you could calibrate your level on it. A nice memory, perhaps, but it takes a little time to get the hang of operating one of these beasts so it doesn’t hurt you (it can), and produces the desired result.
First, safety. It is important to get hold of an operator’s manual and read it. Although the machine is very intuitive to operate, there are some basic safety concepts which must be followed. Other than doing dumb-ass stuff that the machine isn’t designed for, like using the shovel as a working platform, you really have to remember one thing: BALANCE!!! ALWAYS keep the HEAVY end towards the uphill side. If you have a full bucket, then forward is good. If you have an empty bucket, then backward is the preferred arrangement. I made a couple of mistakes along the way and, because the machine is very compact, the center of gravity (CG) can shift quite a bit. It’s a tradeoff between stability and compact size. Fortunately, I did not tip over, but doing wheelies with a 2 ton machine can be scary. Interesting side note: The machine has a “roll cage” which the manufacturer insists that you do not modify in any way. I wonder if that’s because the occasional operator became over-enthusiastic and found themselves upside-down! The other factor affecting balance is the height of the load. The arms can raise the load above your head in order to dump it into a truck. But if you carry the load that way, you are in serious danger of flipping over. Of course, you also need to have personal safety equipment. A hard hat, because you can actually dump crap on yourself (I did), safety glasses (your eyes are vulnerable and too important not to take this simple safety precaution), earplugs because the engine is noisy and I didn’t want to listen to any criticism about my heavy equipment operating skills, and steel toed boots because your feet are important. If your feet get injured, then you can’t walk, and you then become an invalid. Take no chances!
Second, have patience and practice. I saw a lot of You Tube videos on how to operate these machines, and I learned a lot, but there is no substitute for experience and experiment. Start with a relatively benign environment where you have some room to move around, and some latitude to make mistakes. Try to do different operations such as cut, fill, load, and dump. Yes, you may spend an hour or two getting oriented, but the time spent is well worth it.
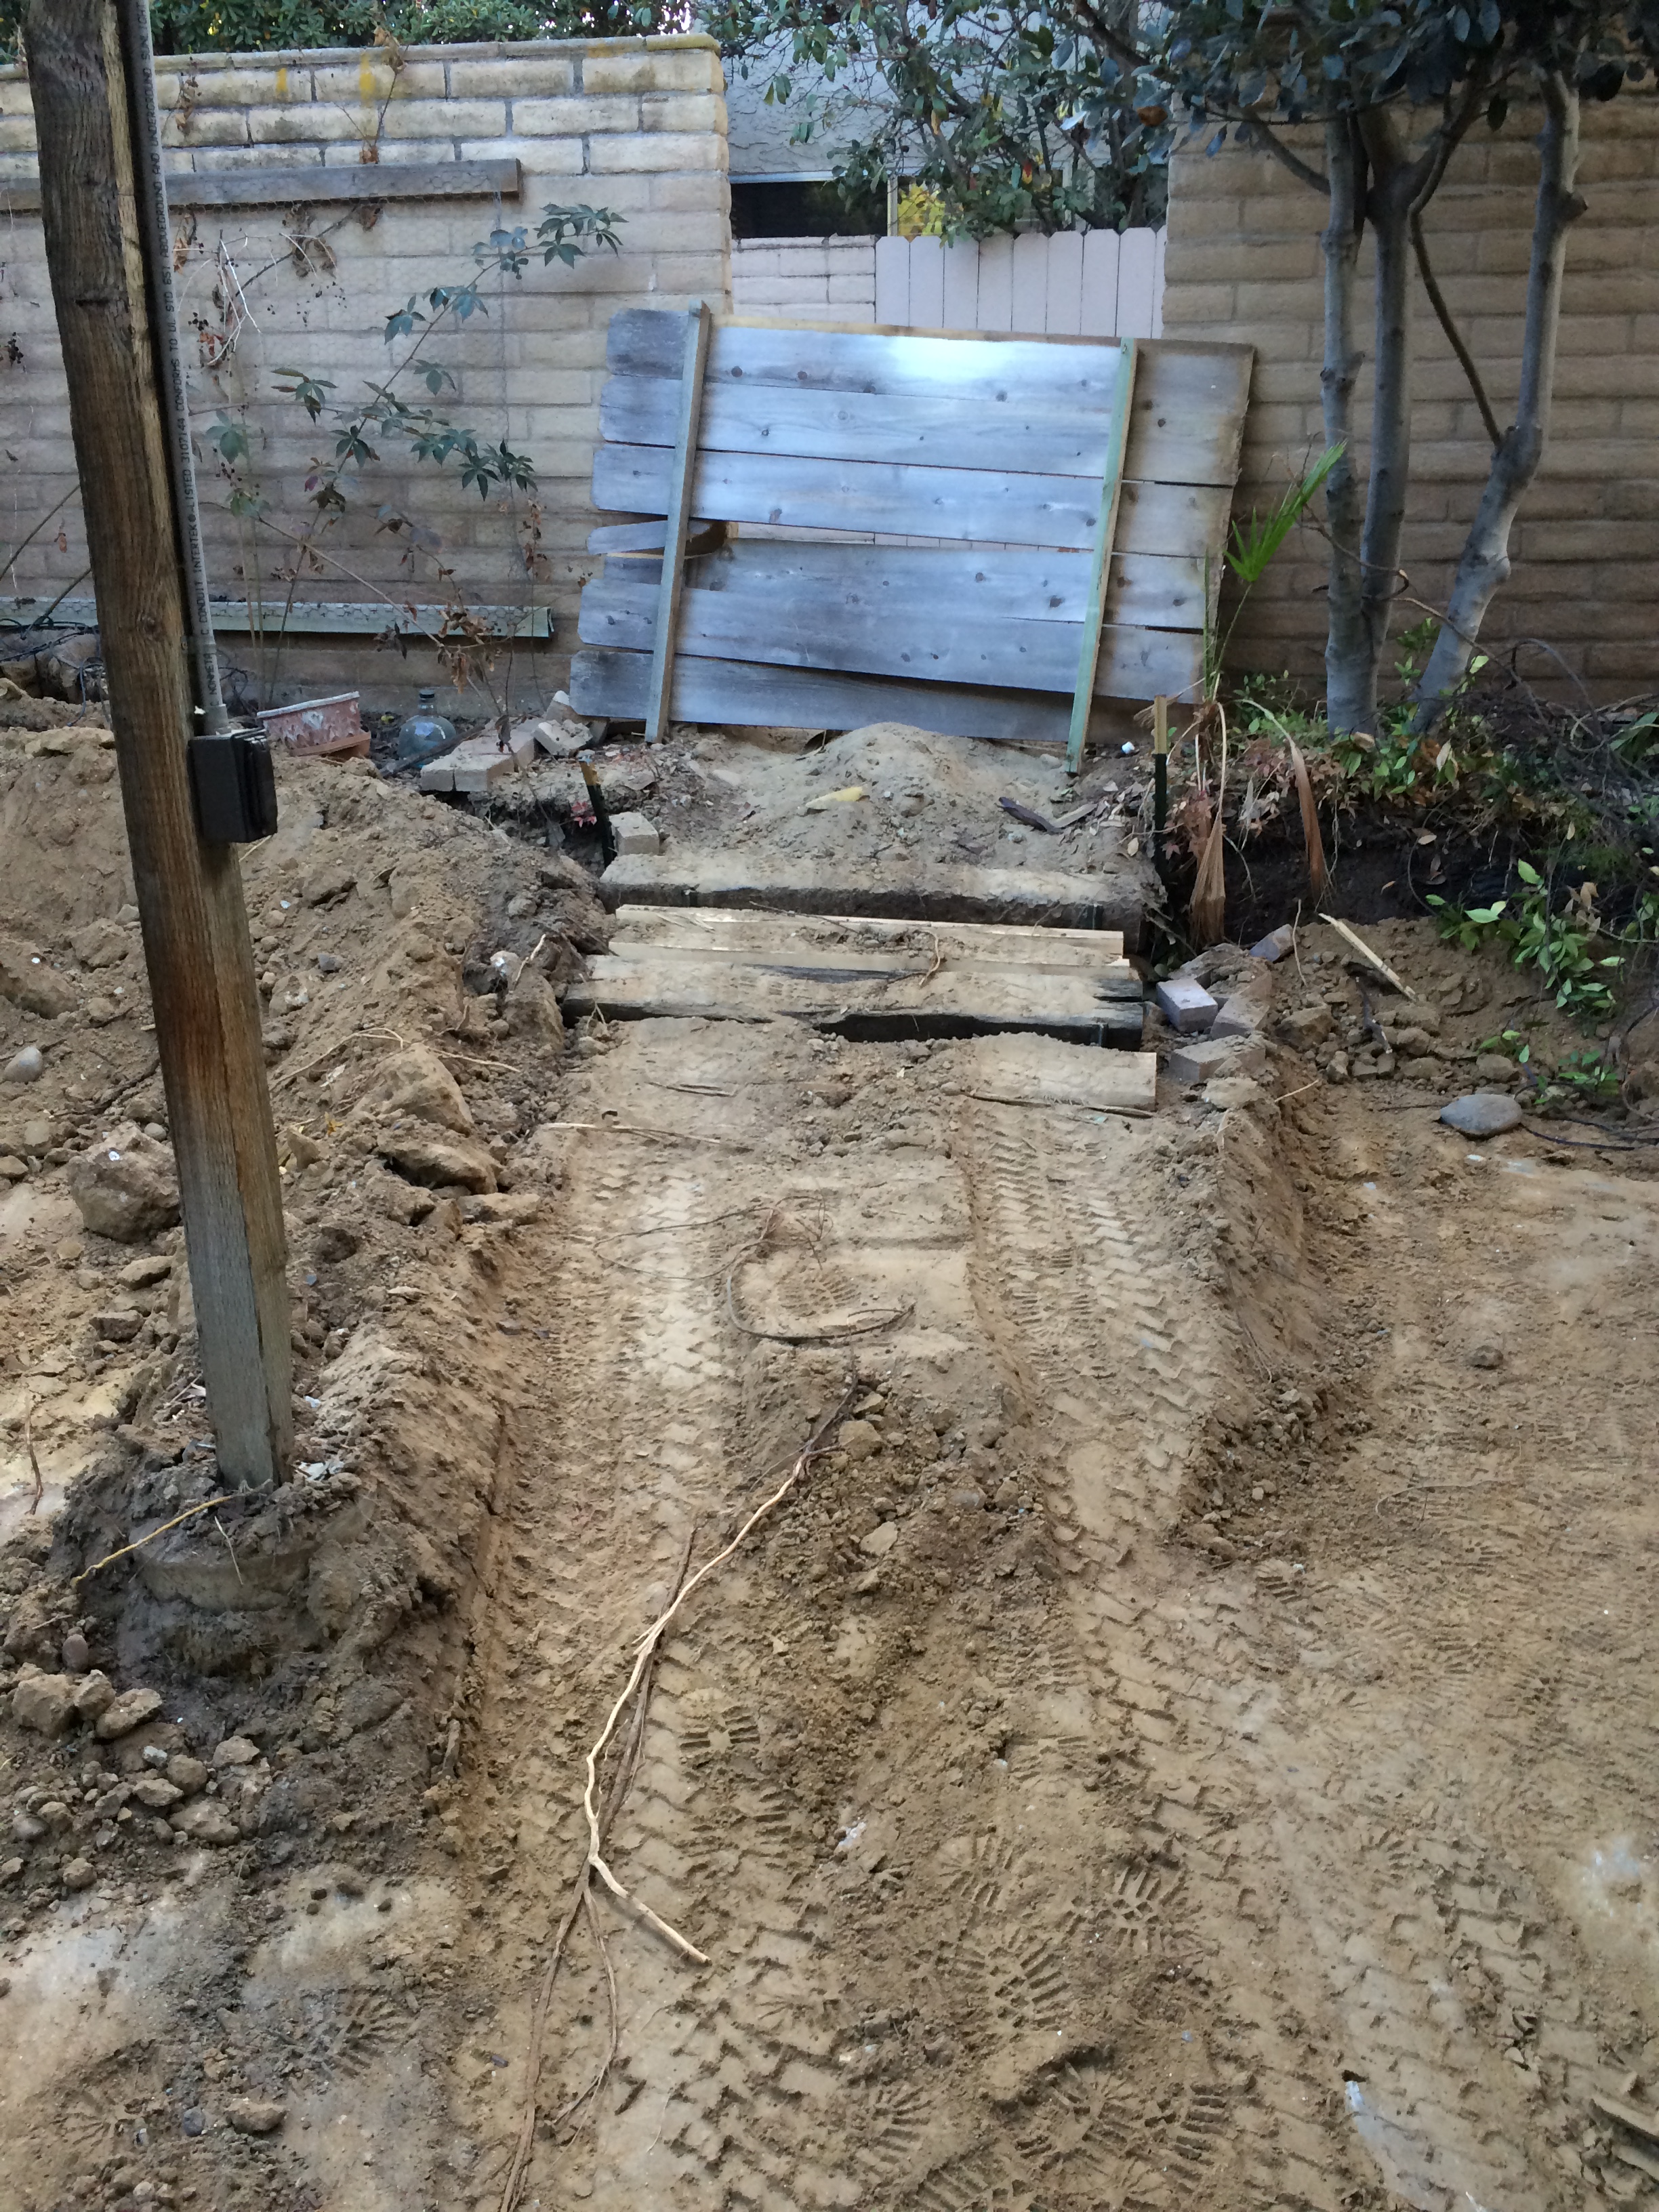
Third, have a plan. This means that you have to think through what you’re going to do given the topography and the desired end result. It’s more nuanced than just getting rid of a bunch of dirt, although you may have to do that at first. Where will you be able to dig? What are the constraints on my maneuverability? Most importantly (for me): how do I get this material out of the back yard an up a 30″ elevation? This last problem was not trivial. I had experienced two failures (detailed in a previous blog), so this time, I used railroad ties to build a “staircase”. I figured that if these ties could support a locomotive, they could support a measly skid steer. Turns out, that I was right. This solution stood up to numerous 2 ton trips. Here is a picture:
A Ramp That Works!
In the end, I learned how to get a full bucket (pile up your stuff, lower your bucket, and ram it while scooping the bucket (right foot) and lifting the arms (left foot). I learned how to cut (lower the bucket and aim down, push forward, but be careful about digging too deep). I learned how to fill (dump some dirt, and then lower your bucket and go backwards, then run over it a bunch to compact the dirt). Other variables include type of soil (this clay shit that I have to work with needs a jackhammer!), and proximity to existing objects (house, patio cover posts, trees….). Bottom line is that I did OK with establishing the grade (using frequent measurements), I got rid of the dirt that I think I needed to, and (most importantly) I didn’t kill myself or anybody else. I consider that a worthy accomplishment. Here some “after” pictures:
Side Yard… Lots of handwork BC the skid steer wouldn’t fit!
Nice grade for the driveway apron
Front yard. This was my practice place.
Backyard — no, I’m NOT installing a swimming pool!
End of a long day. Full dumpster, and the skid steer ready to return. Tomorrow, they will vanish from this scene.
For those of you who were interested in seeing me actually operate the little skid steer beast, Here is my video on steer skid operation:
Here are some more videos of cool skid steer operators:
This guy is my hero. I learned SO MUCH from him.
This is how I learned how to cut and fill. PATIENCE!!
Here is a trickster. See what I mean about balance:
Even the pros F/U:
The other thing I learned is that many of these videos show how the operators make nice even contours given an expansive area. When you’re confined, it doesn’t matter how small your skid steer is. There are places where it won’t reach, and you’ll have to do the work by hand. So it turns out that I have a lot of work to do by hand! But, overall, I probably saved 90% (or more) of the backbreaking manual labor which I am getting ready to undertake as “residual” earthmoving.
In the end, you have to ask the question, was it worth it ? In other words, would this have been an activity that was better to hire out? At first blush, I seemed to think so. Then, I looked up what the going price was for excavation services in my area. I spent about $5,000 between equipment rental, dumpster costs (5 x 15 yd = 75 yd of concrete/stone and soil detritus), and ancillary expenses (diesel fuel, measuring equipment, safety equipment). The cost for 75 yards of excavation was $10,000. So I saved $5,000. Well, I still have some scut work to do with manually finishing the job (that will take several weekends). I guess it hinges on what is most important to you. If you have a tight schedule to meet, then maybe spending $10,000 on hiring a service is OK. On the other hand, if you’re not so dependent on schedule, then maybe saving $5,000 is better. Of course, there was the angst of worrying about the skateboarder who would suddenly appear just as my skid steer was emerging from the back and running into him (her) and killing him (her) and thereby losing what little remains of my fortune. But that didn’t happen, so the bullet was dodged, and I am happily putting aside this phase of the remodeling project. And moving onto the next one! Trenching and inspections. But only after I finish up the manual work of cleaning up the excavation. Wish me luck!
When I was fiddling around in my “research” phase of what it would take to make my home compliant with contemporary standards, I stumbled across the requirement (in California at least) to have new construction homes be equipped with a fire sprinkler system. Being a veteran of the Navy, where there is a fetish about fire protection and safety — think about it, you’re surrounded volatile fuels and explosives in the middle of nowhere — it, needless to say, piqued my interest. I found out that IF you are involved in a fire (unlikely because I have been careful about minimizing the root causes of fire), then the statistics show that protection with a residential sprinkler system increases your survival rate by 80% and decreases your property damage by 70%. How could I not continue? Did I mention a fetish?
It turns out that installation of a residential fire sprinkler system is within the DIY realm. If you’re trying to go with a “modern” plumbing system, which has all sorts of headers and networks and PEX pipes, then it’s probably not DIY. If you don’t know what PEX or a networked plumbing system means, then it’s DEFINITELY NOT DIY. However, if it’s just a retrofit or a new construction, you can install a simple “tree-branch” design.
A “tree-branch” design is simply a source of water that has runs and branches to distribute the water to the individual sprinklers. The basic design mimics the design of a standard plumbing system. The source of the water needs to come from the main water supply to the house, and then branches off before the supply to the rest of the domestic water system. The sprinklers can be thought of as a “complimentary” plumbing system. So, if you can install plumbing using CPVC (Chlorinated Poly Vinyl Chloride) pipe, you’re GTG with a DIY installation. Except…..
There is a pesky requirement called a “hydraulic calculation” which involves a litany of limitations and specifications which, if followed, will ensure that your sprinkler system will spray the correct amount water over the area that it is designed to cover. There are a lot of variables, and the interaction of these variables (e.g., pressure, flowrate, pipe diameter, K-factor) can be intimidating if not fully understood.
FORTUNATELY (for me), this is right up my alley. My studies in chemical engineering involved fluid flow, so I had a good background in what the calculations were all about. I dug back into the recesses of my tiny brain, and , with the help of Wikipedia, reconstructed the seldom used neural synapses to come up with a spreadsheet which helped me figure out the required water pressure at the street main, and the required water pressure of my design. So I called the water authority to get the pressure at my residence (105 psi) and I went merrily to work. I submitted my design, and got told that it was F/U.
First, the assumed pressure was wrong. I had to submit a request for the available water pressure at worst case conditions. It turns out that the fire department and water authority have this dance figured out. I was just not invited to it. Bottom line is that I had to request a “residual” pressure base on worst case conditions. Once I received that, I was back to ground zero. Second, I was not properly accounting for the pressure at the “second” sprinkler. Code requires that whenever you have two or more sprinklers in the same room (compartment), then you must use the most limiting flowrate from two of those sprinklers. I had to lick my wounds and remember the lessons that I learned (and apparently forgot) in my sophomore fluids flow class, and revise my handy-dandy spreadsheet to make it reflect reality.
With the new available pressure, and the right methodology with my spreadsheet, I had to re-do the entire design. In the end though, I actually was able to make the design easier and less expensive to install. The key was to make the k-factors similar. If you don’t understand what I’m talking about, then maybe you shouldn’t be designing a residential fire sprinkler system.
The upshot is that my sprinkler design was approved today. I’m actually quite proud of it because the majority of designers plug their designs into a computer program which tells them whether they are right or not. I did the calculations by hand, so I know that the design will work because I understand the underlying principles. OK, I used a spreadsheet, but I had to put the Hazen-Williams formulas in. I’m sure that if you contract a designer to provide a sprinkler plan for you, that it will be correct and will work just fine. It’s just that the designer won’t know exactly why. Let’s just keep that as our personal secret.
Here is my advice (for what it’s worth):
Get a residential fire sprinkler system. The cost is more than worth the peace of mind and the protection it offers your family and your home.
If you’re DIY, but perhaps not so interested in the nuances of hydraulic calculations, then try to hire a designer who will give you plans. Having said that, you’d better understand some of the nuances of fire sprinkler installation. There are very specific requirements for the mounting of the supply lines and sprinklers so that they don’t jump around when they get activated.
If you’re interested in the design, here are some references:
OK, I know I’m a geek at heart. I really do love to design and to manifest my ideas, in terms of numbers and letters (in the correct sequence) so that they can be created in the physical world. This is what I’m all about, and this is what I hope you can see as I take my next steps on the DIY highway.
P.S. Did you notice that “Why I Did It” contains DIY backwards?
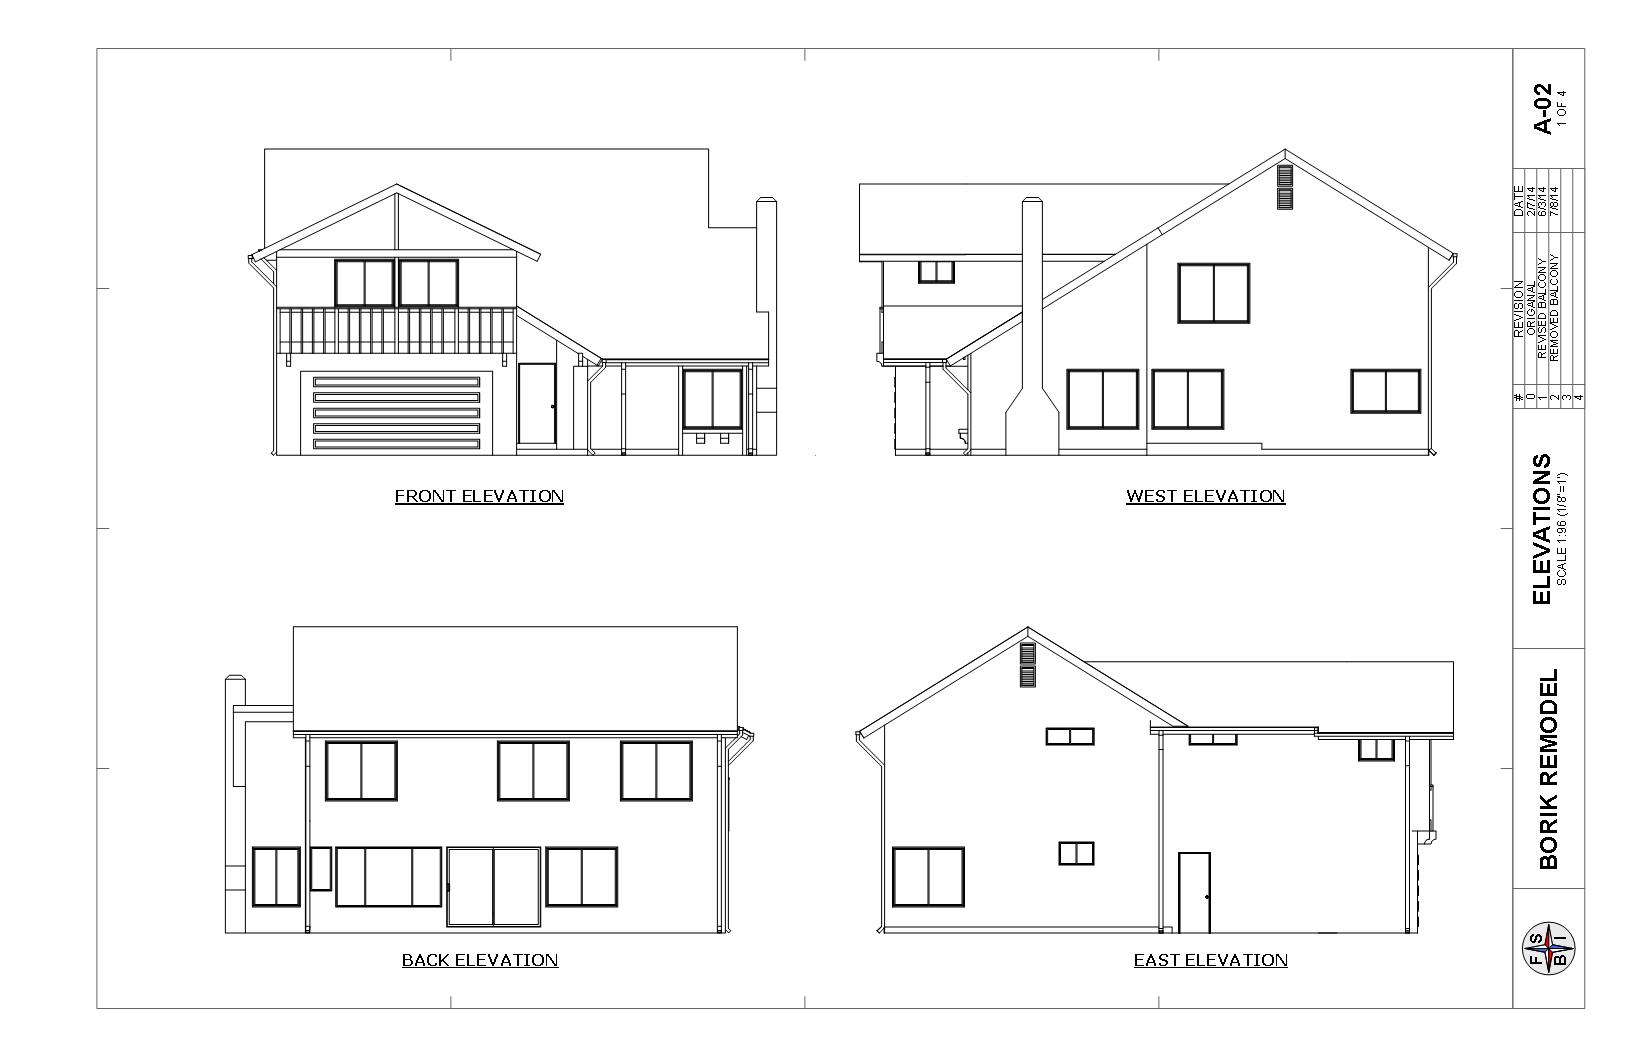
One of the major reasons I started this project was the fact that I had an annoying leak from the roof that was making a big stain on the ceiling in my living room. The leak really comes from a second floor balcony which is adjacent to the master bedroom. The design is poor because water accumulates from the roof and concentrates in the balcony, and there is no easy way for the water to run off. So it stays in the balcony and ultimately leaks onto the porch, the garage, and the living room. I tried three different ways to fix the floor of the balcony (tile, flat roofing, and rubber membrane), and none of them worked. In looking around the rest of the neighborhood with houses of similar design, I noted that they also had the same problem.
ORIGINAL BALCONY DESIGN
So another approach was necessary. Fortunately, a few of the houses had a modification that put a valley roof directly above the porch. I asked the owners if that helped and they all said that it completely solved the leakage problem.
ROOF OVER FRONT PORCH-1
ROOF OVER FRONT PORCH 2
That being said, the balcony itself was just wasted space. It was hot in the afternoon because it faces South West, and it has an expansive view of the garages of my neighbors across the street. Not exactly a place where I’d hang out and relax. So, to make more out of the space, I decided to see what it took to completely eliminate the balcony and expand the master bedroom. There were some homes in the neighborhood that had done that, but I didn’t like the outcome because they didn’t fix the leakage problem. Plus, I wanted to reconfigure the windows to provide better air flow and noise mitigation, and I wanted to rearrange the master bathroom and closet to provide a more open floor plan.
EXPANDED MASTER BEDROOM
So, I looked at my original floor plan, and went back to the type of functionality we wanted. We decided to utilize the new space in an open manner, swap the location of the toilet and lavatory, make a small “room” for the toilet area with folding doors, and enable a natural flow from the bathroom to the dressing area. The dressing area would be open, yet private, and have some nice light coming in from the new windows. We also have some room for a sitting area and our desks. Simple and straightforward, but it looks pretty nice. At least from the plans! I think it meets our requirements for making the most out of wasted space and provides a permanent fix for the roof leak.
Although lighting and electrical design can be, or should be, intimidating (because if you screw up you can electrocute yourself or burn your house down), there are some important design and planning aspects which a DIY’er can accomplish. These revolve around things like placement and functionality, as opposed to detailed design such as number of circuits, wiring requirements, distribution panels, and component specifications. The detailed design is best left to professionals. Even if you’re SURE you know what you’re doing, you still should get some professional advice. More on that later. First: Lighting Design!
Lighting design is important for an age in place home because as you get older, your eyesight diminishes. Besides the inconvenience of fumbling around in the dark for the light switch, older people are endangered by unseen trip hazards. Remember, if you fall when you’re older, you may lose your mobility, and that is a death sentence. Lighting can also be a very aesthetic addition to the home.
There are three types of lighting: (1) Ambient (or General) which is used to provide light to a relatively large area, (think garage overhead lighting); (2) Task lighting, which is directed over specific areas where people do work, such as over the stove or kitchen counter: (3) Accent lighting which is used to draw attention to specific areas such as wall wash lighting for a picture display or outdoor foot lights on the sidewalk. Lighting design can get pretty involved, but a good place to start is the American Lighting Association website that has a lot of good resources to investigate. Another good resource is the California Title 24 Residential_Lighting_Design_Guide. This has some nice plan views to help visually show some of the options. A great resource, if you have to deal with California Title 24 lighting requirements, is the UC Davis California Lighting Technology Center (CLTC). Hey, even if you don’t give a rip about Title 24, this is cutting edge stuff.
So, I went through the house and imagined where I would want light for going from place to place (general), seeing what I was doing when I was cooking and washing my face (task), and highlighting our family picture wall (accent). I then drew up some plans and did some rendering to see what it might look like (here). A short word on rendering. It takes a bit more effort to understand computer rendering. But if you have a good 3D model, you’re over half-way there. It’s actually pretty cool to see your virtual creation look like a photograph, and it’s possible for not too much $$ if you’re willing to take the effort. Kerkytha render is a free program, but you have to jump back and forth from SketchUp, which for me, is a PITA. A better program is Twilight Render, which at $99 is a real bargain. It is integral to SketchUp, and you can produce fantastic photorealistic renders. In any case, I did a few renders and walk-throughs, and came up with a lighting design.
Kitchen Lighting
Another aspect of lighting design is how you’re going to hook up the lights and control them. You want to be able to control certain lights from specific, convenient locations. Many times, you’ll find that it will make sense to control a group of lights from different locations, such as hall lights with a switch and the beginning and end of the hall so you can turn them on and off as you move through the space. That’s where the electrical hook-up comes into play, and we now are getting down into the nitty-gritty of the electrical design.
Now that I had the house drawn up. It was time to start thinking about the re-design. A good place to start was the kitchen because it’s my favorite room in the house. I happen to be an avid amateur chef, and before I started this remodeling project, I was the food King. Meaning that I did all of the menu planning, all of the food shopping, and all of the cooking. And I’ll probably want to pick it back up afterwards because I’m going to have a great kitchen to work in! These culinary experiences and interests give me a particular viewpoint on how a kitchen should be designed. I had some concepts and constraints in mind when I approached the kitchen design. In addition to having a good physical and experience-based idea of what I wanted as a cook, I also wanted to have things easy to clean, easy to access, durable, attractive, and inexpensive. There were many features of my current kitchen which I really liked, and in the end, I kept the same basic design. Yes, I tweaked some things, and yes, I came to the conclusion that I would have to re-do the cabinets and the island, which gave me the opportunity to put my woodworking skills and tools to good use, and incorporate some additional features. Let’s face it. Every dedicated DIY fanatic ALWAYS is in search of the next “project”, so here was yet another opportunity. And in continuing my research, I found that the original design was actually a better design than I thought. One of the things that I noticed about most of the model homes we visited during our “Love It Or List It” period was the fact that most kitchen designs suck. I mean really. Most of them look great if you just want to hang out and eat, but cook? Refrigerators across the room from the ovens. Islands too far from the other countertops. Backsplashes made of expensive material that looks nice but will be a bitch to keep clean. Storage that’s clumsily arranged and hard to get to. No concept of workflow (storage to preparation to cooking to cleaning). And my pet peeve: a microwave over the stove. So I started with that, and then went down the list of things that I didn’t like, but keep the stuff I did.
Get rid of the microwave over the stove. These things have almost zero fan power and don’t extend far enough over the stove top to trap the oils and particulate that are a part of your cooking. So all of that junk gets embedded in the wood of your cabinets and the ceiling above. Impossible to clean. Plus, the heat from the stovetop kills the plastic and fries the electronics. And the house gets all stunk up when you’re creating yet another culinary masterpiece that you will decide is too hard to ever do again. (Why do I keep doing that?) Replace it with a good vent hood that is designed for the purpose.
Resize the island to make it closer to the sink so I could easily step back and forth, and farther from the refrigerator so people could go in and out of the kitchen with the refrigerator door open. Relocate the microwave to the island. Having the microwave in the island is a universal design concept that allows easy access to somebody who can’t reach high, but is convenient for everyone.
Make pullouts for all of the shelves in the base cabinets, island and pantry. Another universal design feature. As you age, it’s more difficult to get on your hands and knees and look in the way-back for this pot or that bag of flour. Come to think of it, it’s a Pain-In-The-Ass (PITA) at any age. (If I didn’t spell it out, you would have thought I was talking about some kind of bread.)
Redesign the island countertop for 2 levels. One at 36” for standing work, and one at 30” for seated work. Another universal design feature.
Make the inner carcass of the cabinets around the dishwasher and sink out of pressure treated plywood. The current particleboard is coming apart.
Integrate beverage storage/liquor cabinet into the island design.
Lower the “spice rack”. My current island has an area between the work surfaces and the “bar” where I keep all of my baking and cooking essentials (spices, flour, sugar, oils, seasonings, baking power etc.) When you’re in the midst of cooking, this arrangement is extremely helpful in streamlining your workflow because you’re not constantly going in and out of the pantry to get the next ingredient. The only downers are (a) the tops of the containers tend to accumulate detritus — hopefully solved with the vent hood, and (b) it was placed too high to conveniently see the football games being played in the den. The new design corrects this problem.
Provide a place for all of my cookbooks so I would have to ferret around for them (too much, anyway).
Have a pull out cart for the mixer (a king size kitchen aid) that also serves as a supplemental work surface. More universal design.
Provide increased task lighting and general lighting (universal design).
Make the backsplash out of white porcelain tile with a decorative glass inset. Looks nice, easy to keep clean, and inexpensive.
Have a white quartz countertop on the upper top of the island. The purpose is to be have a place to roll out pastries and cookies without having to lug out a slab of marble (which isn’t big enough anyway).
All other countertops will be white Formica with a decorative oak rub rail. I did this on the first remodel of this kitchen about 12 years ago, and it still looks pretty good. Yes, it needs a refresh, but these tops aren’t that hard to make and they aren’t very expensive either so occasional replacement is no big deal. I guess I’m not a big fan of these stone/granite/marble/glass composite/concrete countertops. I mostly don’t like the look because it’s distracting when you’re trying to cook because it’s not a clean background, they’re hard surfaces so stuff breaks on them when you drop something, and they’re so dang expensive. They seem to be pretty popular, but I wonder if any of the designers/builders/owners of these are actually serious cooks. One question: Have you ever seen granite countertops in a restaurant kitchen? I think I prove my point. AND, I have the best restaurant in town. If you’re lucky, I’ll have you over for one of my dinner parties!
Laminate wood flooring. I know what you’re saying – this stuff has a funny sound and is not as warm and inviting as real wood (or engineered wood). Here’s the deal: It’s inexpensive, has good traction (universal design), durable, and EASY TO KEEP CLEAN. Did I mention that it was easy to keep clean? Hey a bucket of water, a greenie, and a squeegee and you’re good to go. No fancy waxes, dirt in the grout lines, peeling varnish or gouges (like linoleum). I installed it in my last kitchen remodel 12 years ago and the only defect is when my King size kitchen aid mixer fell off the counter while kneading an extra large bread dough recipe and made a divot. It has filled up with dirt over the years so I’m GTG.
Here is a rendering of what the kitchen will look like.
KITCHEN REMODEL
Here is a SketchUp model of the island. If you know about Dynamic Components, check out the microwave, the drawers and doors, and the cart pull-out.
This program is extremely powerful. And fun I might add. It has probably 90% of what you get in the pro version, and if your aim is to model, or do some small scale projects, this might be the ticket. BUT… if you want to DIY like a pro, well, you need to consider the pro version. More on that later.
About 3 years ago, my wife and I were discussing some repairs that had to be made to our house, and I decided to look into what it would take to remodel instead of just putting a band-aid fix on things and slapping on a new roof and paint. As I was working on the planning phase of this project, I not only learned a lot from other bloggers and websites, but also started to think about giving back in the form of sharing my experiences and thoughts. Today, I submitted my plans to the building department for, what I hope, is the final approval. Upon reaching this milestone, I thought it would be a good idea to start this blog so that I could record things in a more real-time fashion, as well as start to capture my experience so that I wouldn’t forget it.
What qualifies me to write a blog about a remodeling project? Nothing in particular, I suppose, other than I want to write about my experiences to share with those who may benefit when undertaking similar projects. But perhaps more importantly, this is a do-it-yourself (DIY) deal. I’ve always been a DIY around the house with various projects, and this one is going to be a “Mother Of All Projects”. (MOAP — that’s a lousy acronym. I’ll try to think of something else.) Certainly something that will be challenging, as well as pleasurable. Let’s face it — if you’re somebody who is inclined to the DIY approach, you probably do it because you like it. It’s a lot of fun seeing something tangible come out of your own creative efforts and skill, and it’s also fun to learn different skills and improve the ones you have. Note that I did NOT say anything about saving lots of money. More about that later. Suffice it to say that if you’re in it ONLY to save money, then some of the things that I write about may not be for you. That’s OK, because reading about it may be helpful in its own right.
I do have certain predilections and experiences which influence my decision to take on a given DIY project (or not). While I’m not trying to toot my horn here (I save that for dickheads who run red lights), I think that describing these up front will help put things in perspective for taking on such a large project by myself.
1. I absolutely LOVE building and creating. I can think of little else that I would rather do with my time.
2. I have been doing DIY projects for many years (over 30). These projects range from minor renovations in bathrooms and kitchens (floors, tiles, fixtures), to building outdoor structures, such as fences, storage sheds, concrete sidewalks, brick on sand patios, and even a gazebo.
3. I am a wood worker and have some serious woodworking tools in my shop. I’ve also built furniture and even a wooden boat!
4. I have an engineering degree (chemical), and I am a retired naval submarine officer. I have a lot of professional experience with industrial construction and repair work aboard ships (with nuclear reactors). So, I know how to read plans, follow specifications and procedures, and understand the hows and whys of machines and structures. Most importantly, the nuclear submarine “culture” fosters the attitude that you can figure ANYTHING out by yourself if you take the time and effort to look things up.
5. I have significant experience in project management in my current line of work. I know how to plan and execute major projects to include integrated master planning and integrated master scheduling. I also have a good working knowledge of contracts and contractual law, as well as budgeting and managing costs.
Given that background, I felt fairly confident that I would be able to handle a home remodeling project.
So, today, with my plans submitted, I’m gearing up to break ground and start turning my home into a remodeling paradise. Or hell. Take your pick. I know which one my wife is thinking about! I invite you to accompany me on this journey and I hope you find it interesting, if not helpful, and perhaps even humorous on occasion.