
Things are beginning to shape up in front, and one of the final “projects” was going to be to pour the concrete. This is DEFINITELY a job for a professional crew — NOT DIY! I know this from harsh, personal experience. Oh, I know, the videos make it seem really easy, but trust me, striking off a mound of concrete with a screed is hard, messy work, and is actually quite comical if it’s just you and your wife doing it. OK, I’ve done a couple of small sidewalks, but this job is way too large and intricate to trust to anybody but a professional crew. Hey, at least give me credit for knowing the difference!
Be that as it may, I had my plans, so I know what I wanted to do. Well, at least I thought that I did at the beginning. More on that later. The fact is that a dedicated DIY’er can do essentially all of the prep work. This is quite a lot of work, it turns out, and while you may get some benefit of saving some money, the biggest advantage for me was giving the concrete subcontractor a lot of flexibility with the schedule. If you have a pro do the whole job (demolition, site and grade prep, base fill, building the concrete forms, and setting out the remesh), then you’ll have to wait several weeks until the schedule is clear for a multi-day (or week) job. If you do all of the work, it’s a 1 day job of pouring and finishing the concrete, which can be scheduled more easily. Now for all of that prep work.
Demolition was done previously, per several of my previous posts. And, although I did a reasonable job of getting the grade set correctly with the steer skid, I still had a fair amount of cleanup to do. The skid steer doesn’t get into the corners, plus I had to get some stumps ground after I had completed the initial excavation. Plus the rains over the winter (such as they were) ended up “displacing” some dirt which had to be “re-placed”. In other words moved around some more. I ended up barrowing out about 4-5 yards of dirt to the back.

Will I EVER get rid of this dirt?
The next thing to do was to set up a base. I had a choice between 3/4″ gravel and “class II road base”. I decided to use gravel because I though it might be better, but it turns out that class II road base is what is typically used around here because gravel is used for areas where frost heave is a problem, and you want something to absorb the resulting ground motion. Road base is less expensive (!), and since it compacts way better, I plan on using it as the base for my brick-on-sand patio. So I find this out too late and I now have 7 yards of gravel to chuck and spread around. C’est la vie! Fortunately this went reasonably quickly. The only hiccup was that I had to somehow figure out a way to get wheelbarrows of this stuff to the back while navigating around previously installed drainage pipes that were annoyingly protruding from the ground. My solution was to barrow a pile of gravel around the drains and then take some plywood and make little ramps so that I could gingerly push a wheelbarrow with several hundred pounds of gravel through the maze that eventually lead to the back yard. After all was distributed, I rented a plate compactor to give a good solid base. Because the compactor wouldn’t fit into the corners, or around some of the obstacles sticking up, I had to use a hand compactor to get everything nice and tight.

That there is a cubic butt ton of gravel to move!

Chucking gravel from front to back. Note the plywood highway.

I used a pile of gravel and some plywood ramps to navigate around the drain grates that were sticking up. I ended up raking the gravel level as i worked my way back, so it ended up all good.
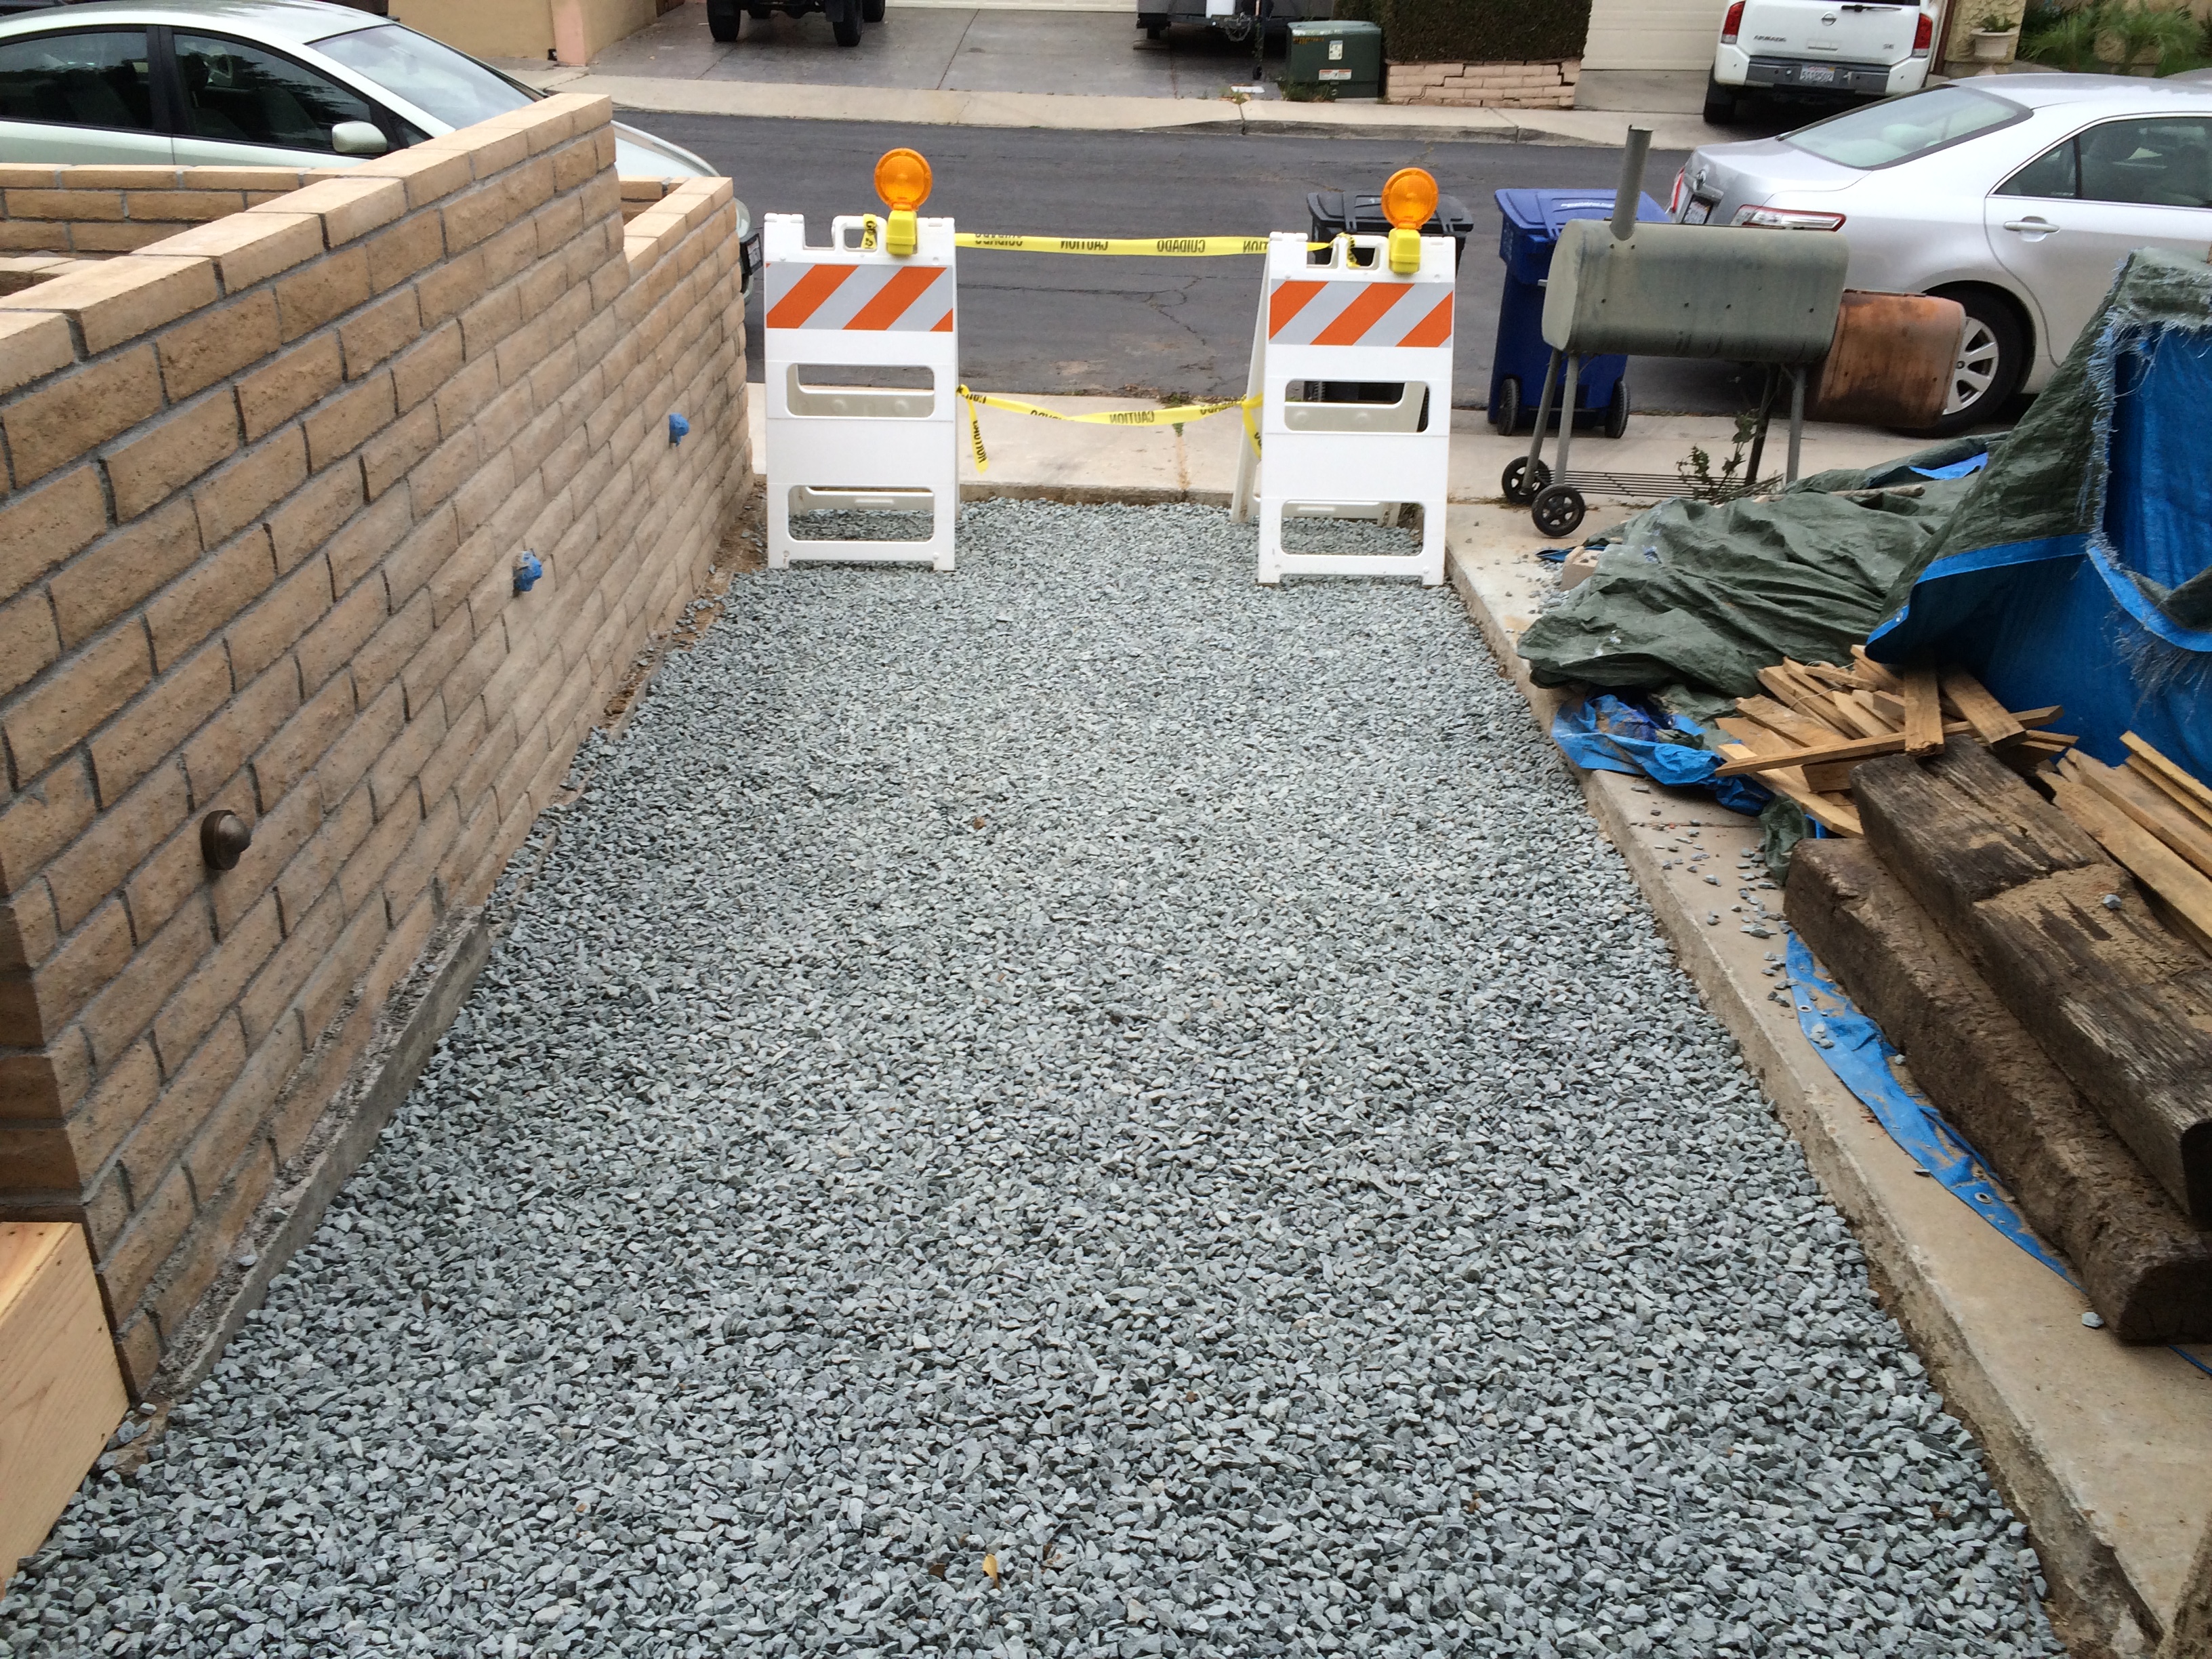
Front entrance gravel all level and compact. Ready for the forms.
While I was gearing up to move all of this gravel, I also had to buy lumber for the forms. So, I woke up early on a Saturday and headed over to the local Home Depot. Alas, it was raining, so it promised to be a mucky day outside. As I drove into the parking lot, I saw that the rental truck was conveniently parked, so I assumed it was available. I loaded up a bunch of lumber (plywood, 2x4s.), paid for it, and tried to rent the truck. I was then told it was out of commission for some obscure reason. Since my mood sufficiently sour to begin with, I vented my frustration. The customer service people were very nice, let me have my say, then proceeded to help me out with a free delivery. How good is that? So, shame on me for being a dickhead, but good for the Home Depot folks. I sent their boss a nice e-mail apologizing for my brief outburst and profusely thanking them for their excellent customer service. At any rate, I come back to the house and discover that my brand new wheelbarrow has a flat tire that will not succumb to mere inflation. So it’s back to Home Depot to get a flat-free tire. I guess it just was going to be one of those days….

My new wheelbarrow with a flat tire. Come on!
Next was the forms. With my previous experiences with concrete, getting the forms right was always a challenge. So this time, I wanted to make them very sturdy and straight. I used 1/2″ plywood and made a frame of 2x4s to support the plywood so there would be no bending. The 2×4 frames also gave me something solid to work with so when I drove the stakes, I would be using the forms as the guide. The contractors who came out to bid basically said that this was overkill, and they may have been right. But as a DIY guy working alone, I think this gave me the best result and minimized the amount of fussing around to get the forms aligned and in place.

Frame for the form. I had to eventually rebuild this one because it was too large, but you get the idea.
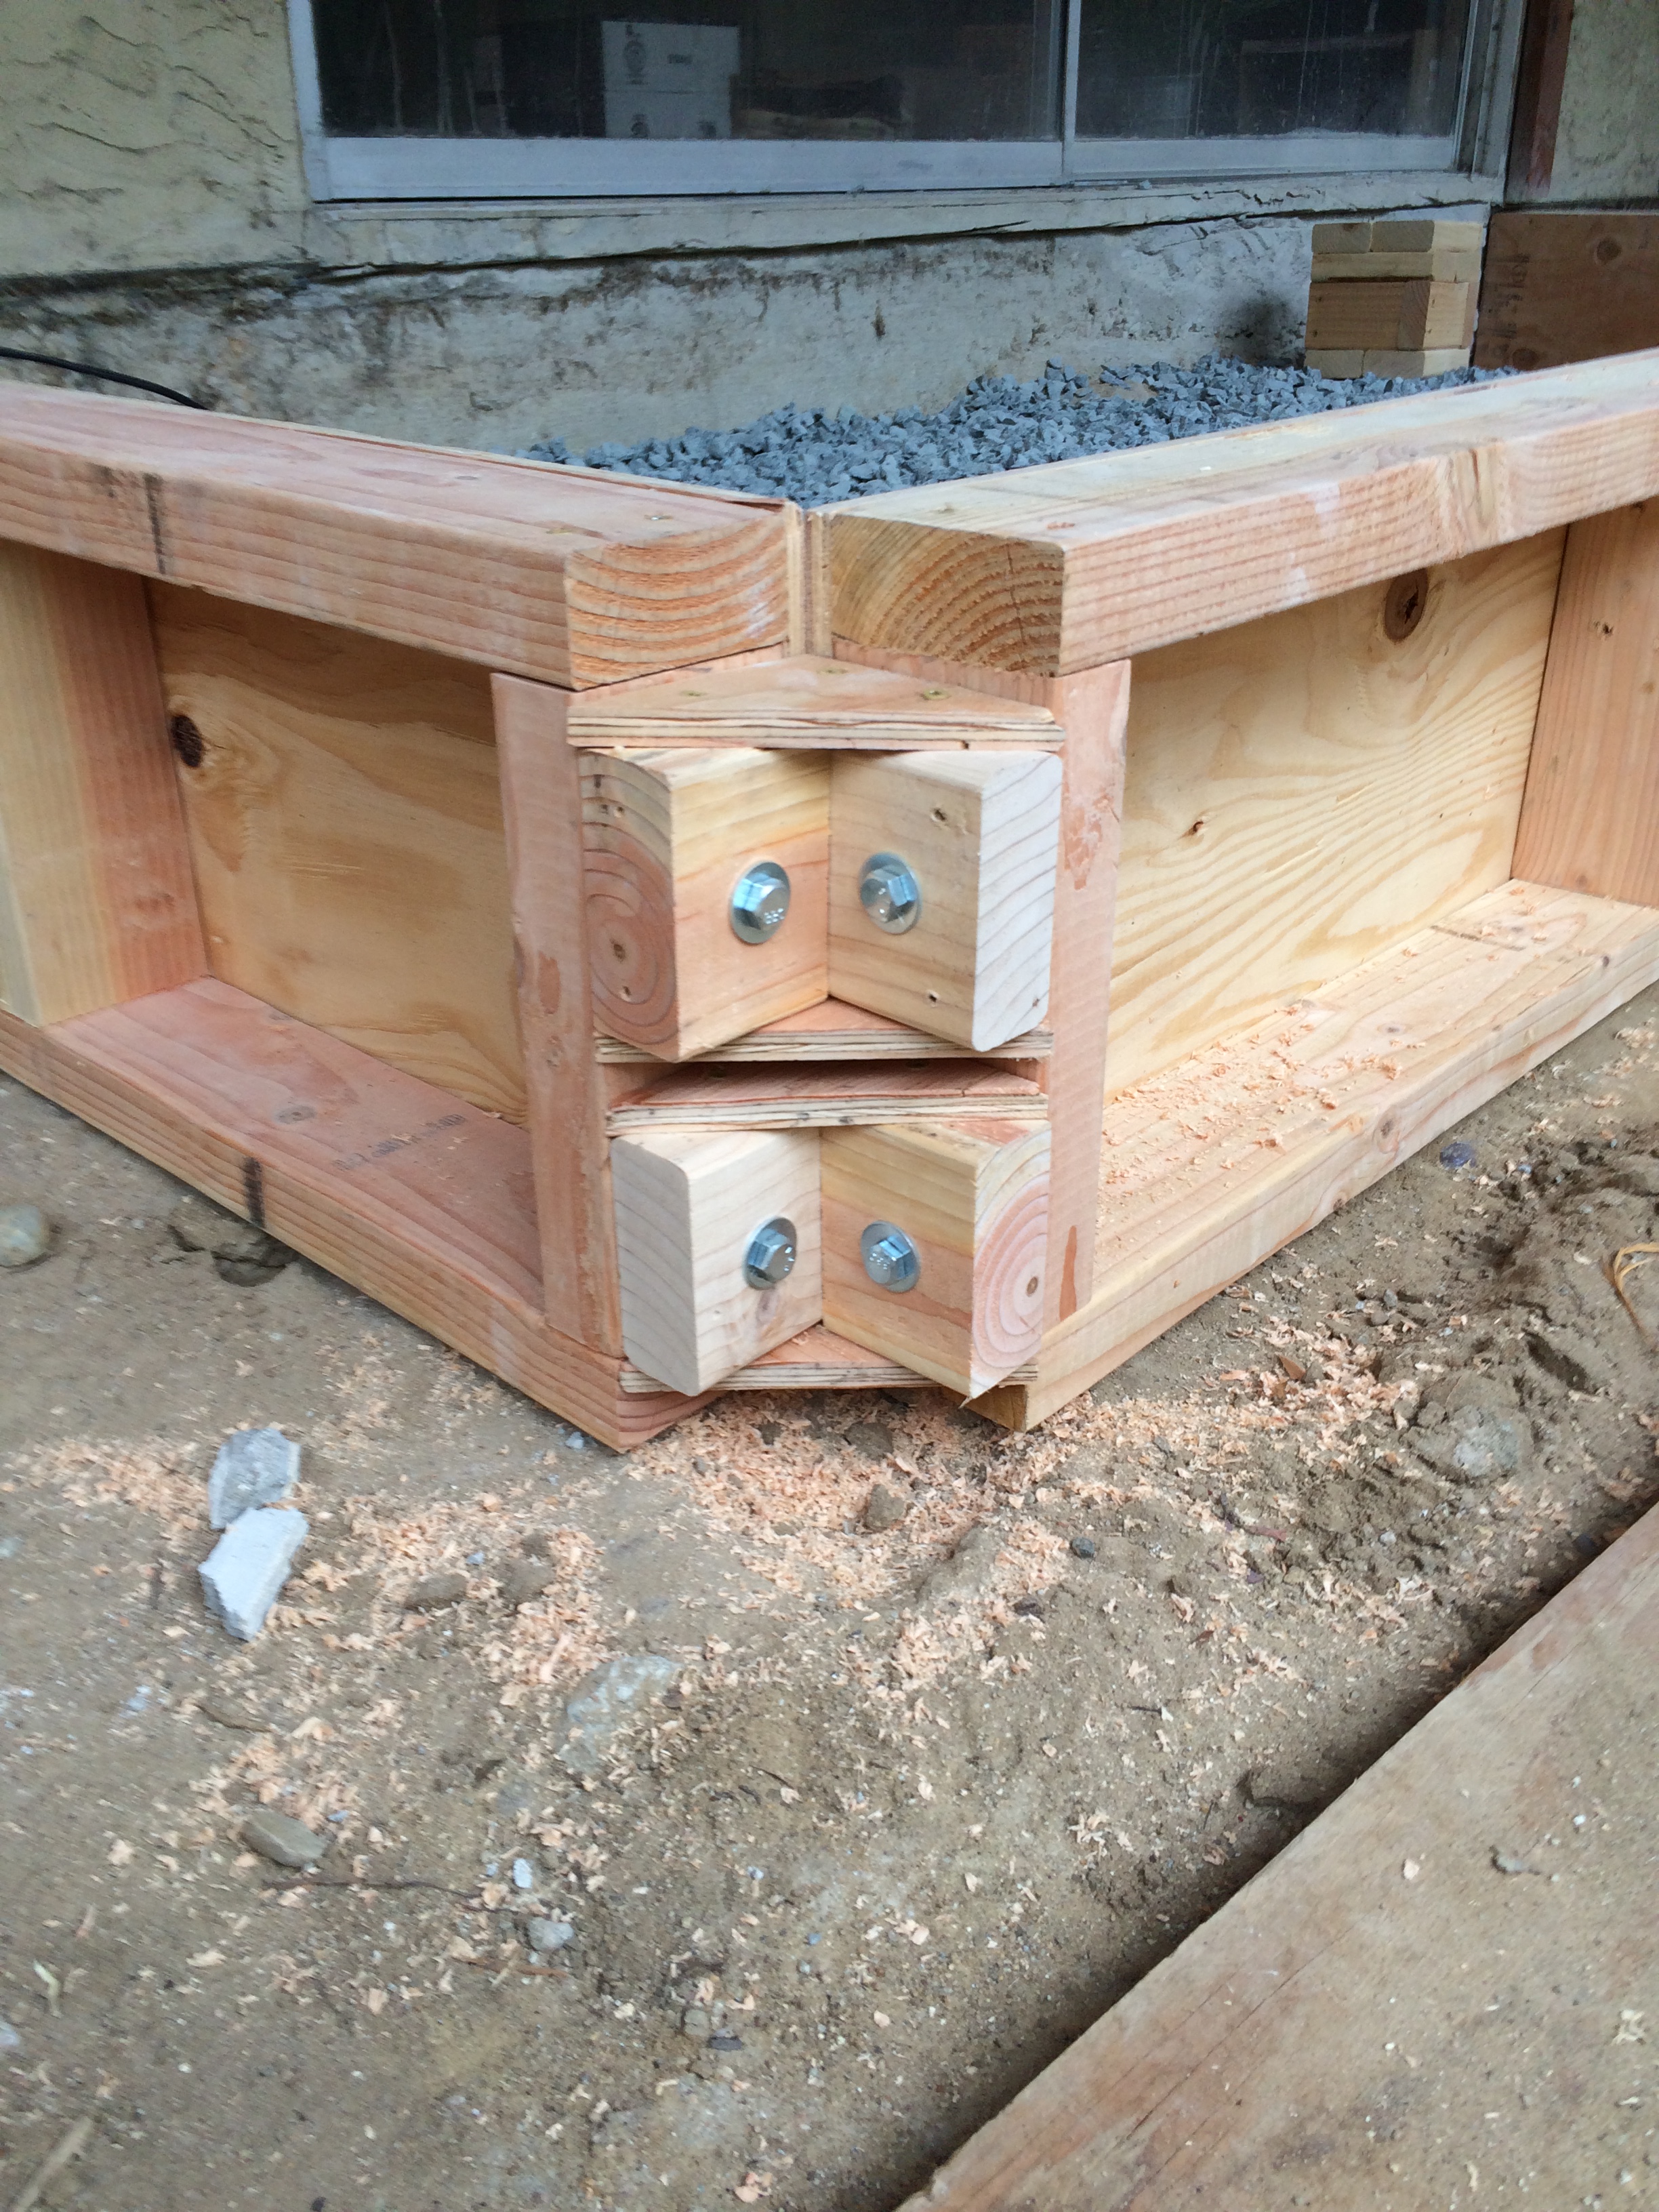
Detail of my forms. The corners are bolted together with braces that pull everything tight and square, and make disassembly very easy. Too bad I won’t be using these again.

Bottom of plywood on form extends down to allow for concrete to flow between levels to allow a monolithic slab without a lot of fuss in removing the form to finish the faces.
One of the nuances of my design was that I wanted to place can lights within the concrete to provide lighting for the steps (as a safety feature). Although the lights that I chose were rated for casting in concrete, in the long run, that is a bad idea because when (not if) they fail, you’ll have to tear out the concrete to get to them. No thanks. So, my plan was to construct plywood molds that would result in a perfectly sized recess that I could fit the lights into. Additionally, the molds had a hole that accepted PVC conduit, so that I could run the wiring between the boxes and back out through the wires that I had cleverly routed around the house while I was digging the drainage lines to supply the power. This is 12v lighting, so no problem with running the wires adjacent to where water might be. However, on the back porch, the lights needed to be located near the top of the slab. This could be problematic with cracking, so I added a 1×1 wire mesh reinforcement with material I had left over from a previous project. I also knocked down the sharp edges of the plywood boxes to minimize stress concentrations. My hope is that, with these little details, plus the fact that I am going to tile over these fragile areas, will make everything all right.
After I had set up the forms, I and my wife had a good chance to look at what the final result might be and, you guessed it, we were having some reservations. So, we took a step back, and perhaps some steps around, and started to actually walk through the expected traffic patterns. After a few iterations, it became obvious that we had to change things around a little in the front, and that is one of the advantages of DIY. You really can change things at almost the last-minute without a great impact on cost or schedule. Had this been an agreed upon design and had I already had a contractor doing the work, changing this stuff would have been out of the question. Of course, perhaps my design was not so good to begin with, and maybe a pro would have come up with the right answer in the first place, but what fun is that? I also had to re-design (and re-build) the forms to have the proper height above the finished concrete surface and provide a gap underneath so that the pour could be continuous, resulting in a monolithic slab. Good thing I had ordered some extra lumber!

The front landing is disjointed and not ergonomic. It looked better in the model and plans.

Just doesn’t look right.

That’s more like it! Nicely balanced and allows access up the ramp (on the right), from the driveway apron (on the left), and from the garage.
While I was doing all of this, it was time to get some bids for the work. I had a number of folks come by, and each was very helpful and offered some advice as I was finishing up. One comment was pretty much universal: “Fill in the areas where you have deep concrete (e.g. the back porch and front landing) with materials that are less expensive than concrete. Well, it turns out that I had a big pile of masonry detritus accumulated from my previous work, so it was a no-brainer to chuck that stuff into these areas, if not to save money, than to just get rid of the stuff in a manner that did not involve surreptitiously dumping this crap into the residential waste stream over a long period of time. Which is my normal modus operandi. I learned this from my wife.
Finally, the re-mesh. This is a welded wire mesh that is used to provide reinforcement in the concrete. It is made of large gauge (#6) steel wires that are spot welded together to form a 6″x6” mesh. You can buy these in flat sheets of 5’x8′, but that is much more expensive than buying a 150′ roll and cutting it yourself. Of course, I did the latter. I had previously purchased a heavy-duty wire cutter (essential for this work) and set about unrolling the beast and nipping off sections so that they fit where I needed to put them. I ended up with a number of relatively small pieces because (a) they were easier to make flat — the roll has some “memory” so you have to bend it a little to make it lie flat — and (b) they were easier to handle and place where I needed them.
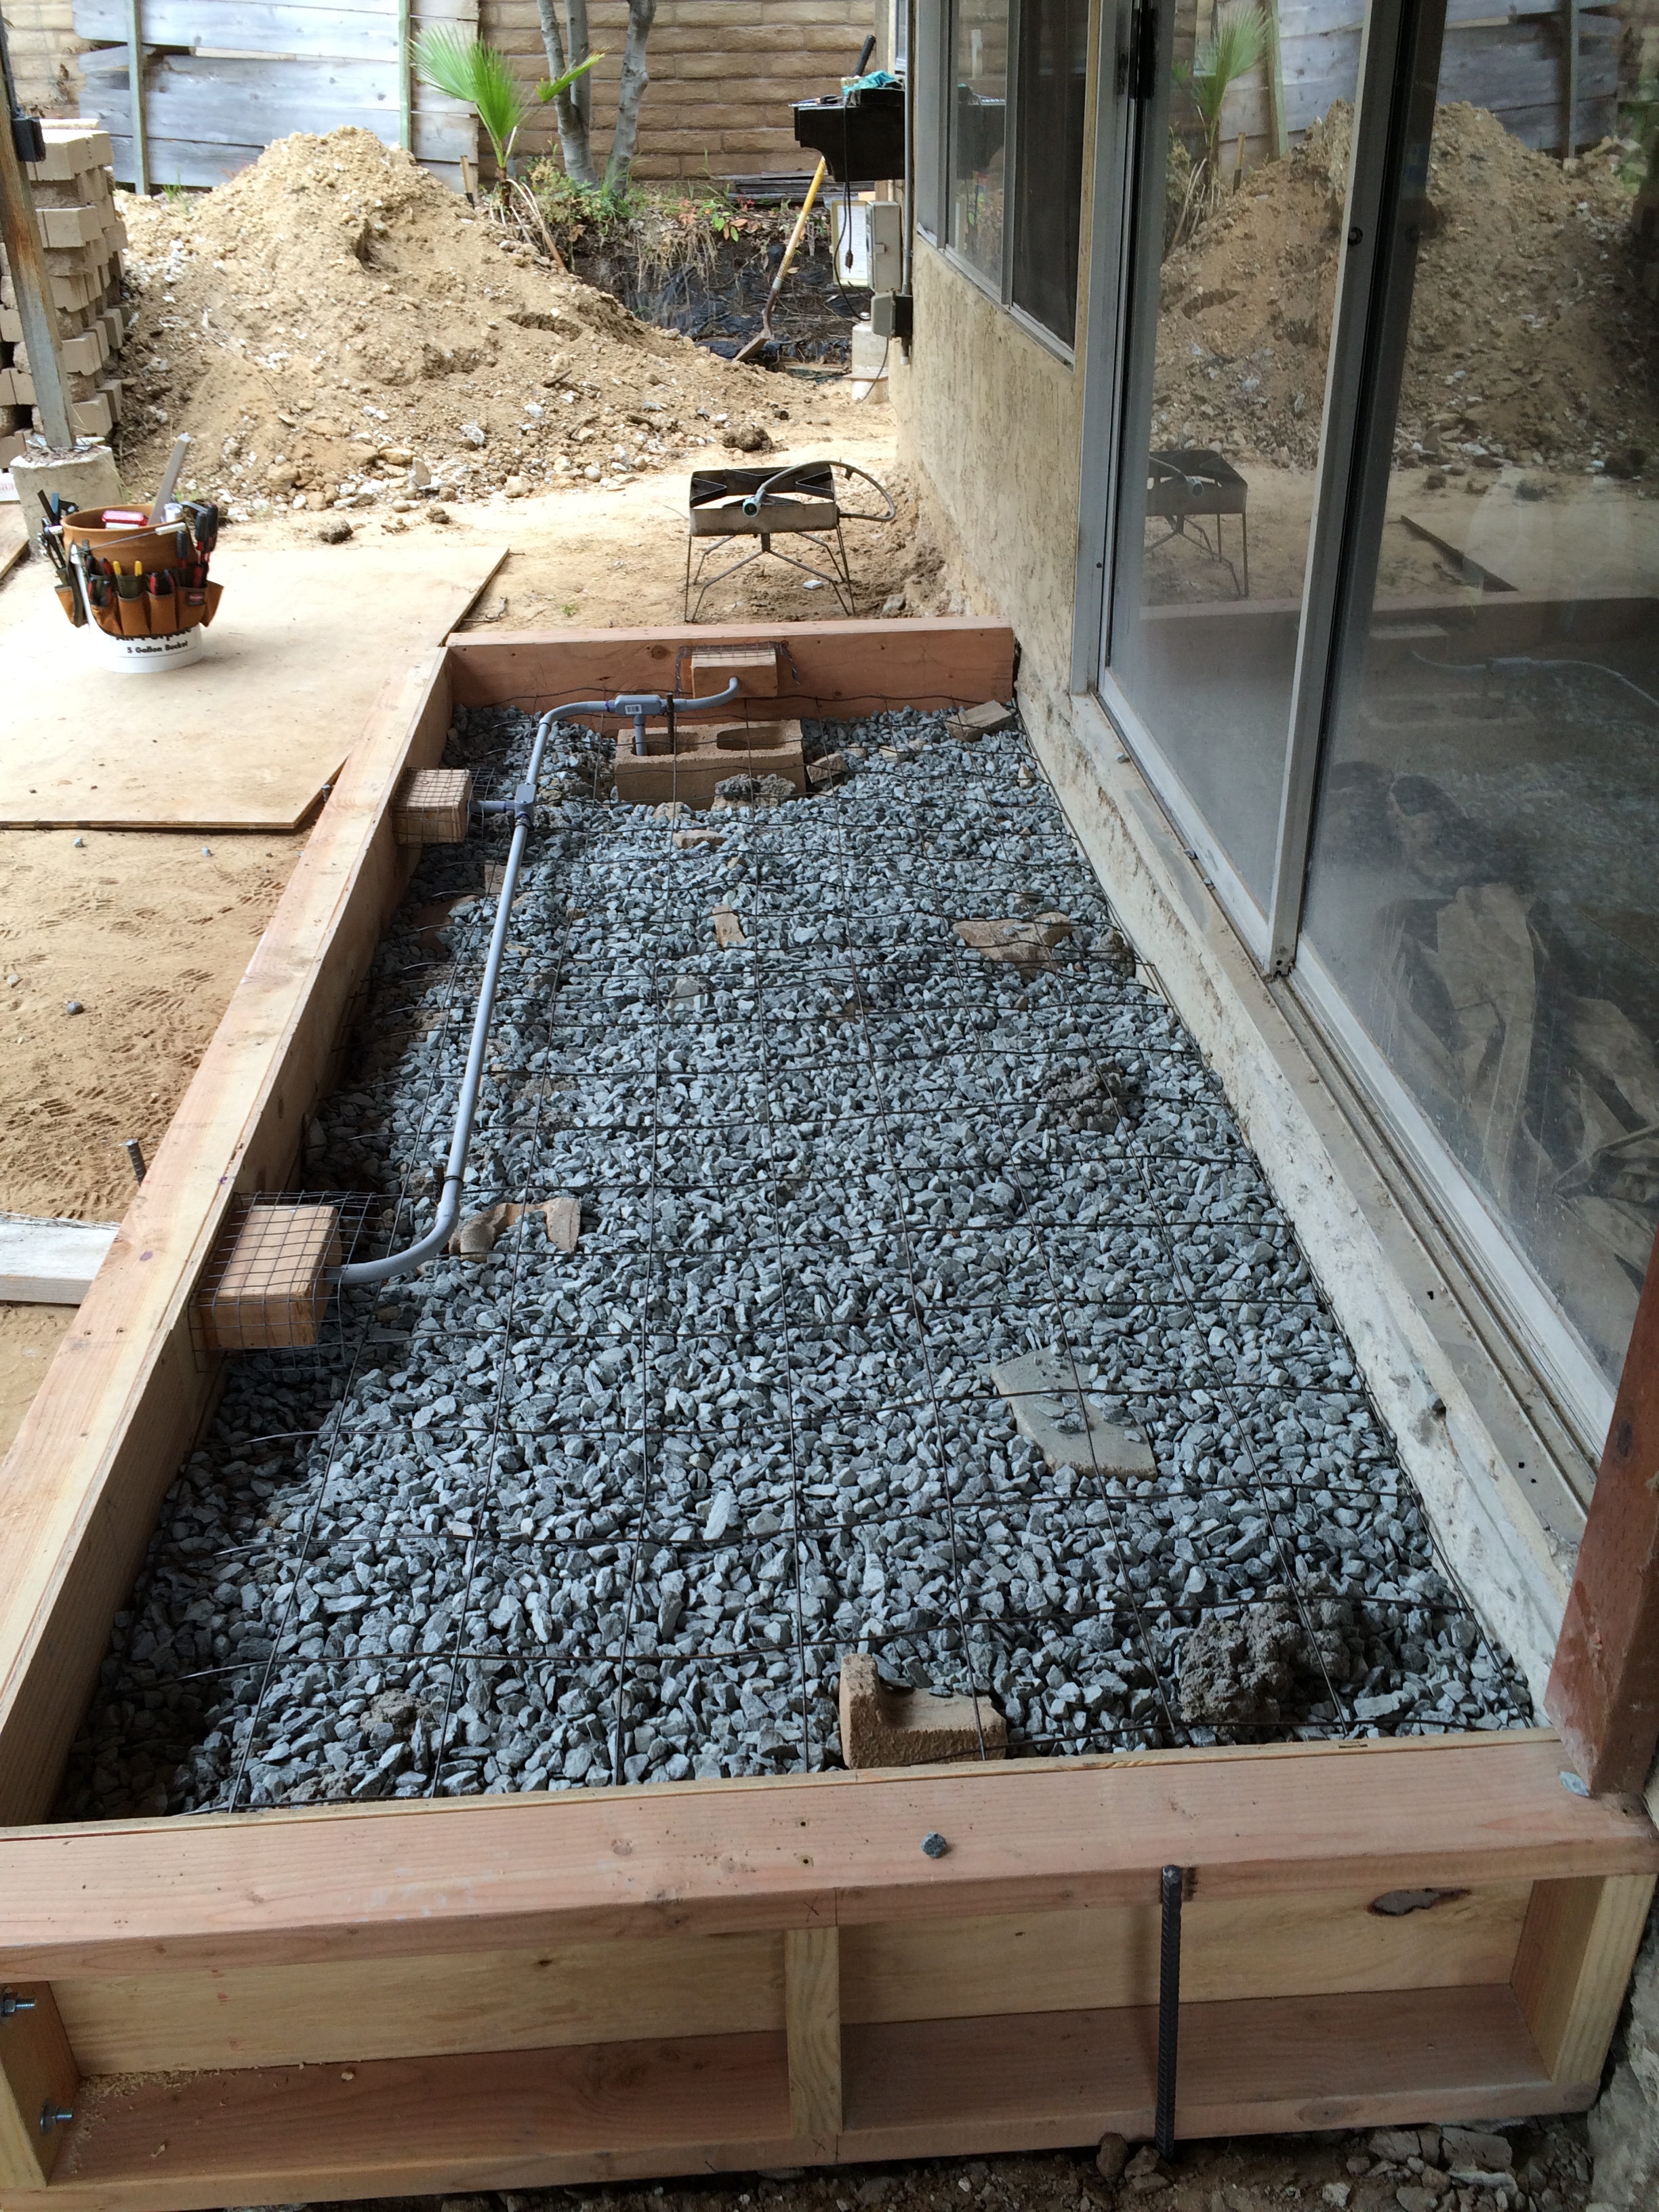
Back porch ready for the pour. Can you see the masonry detritus poking through the gravel? Also a good look at the forms and reinforcement for the can lights.
Left driveway apron all ready for the pour.

PVC electrical conduit is supported by rebar stakes so that it won’t bend when the concrete is poured over it.

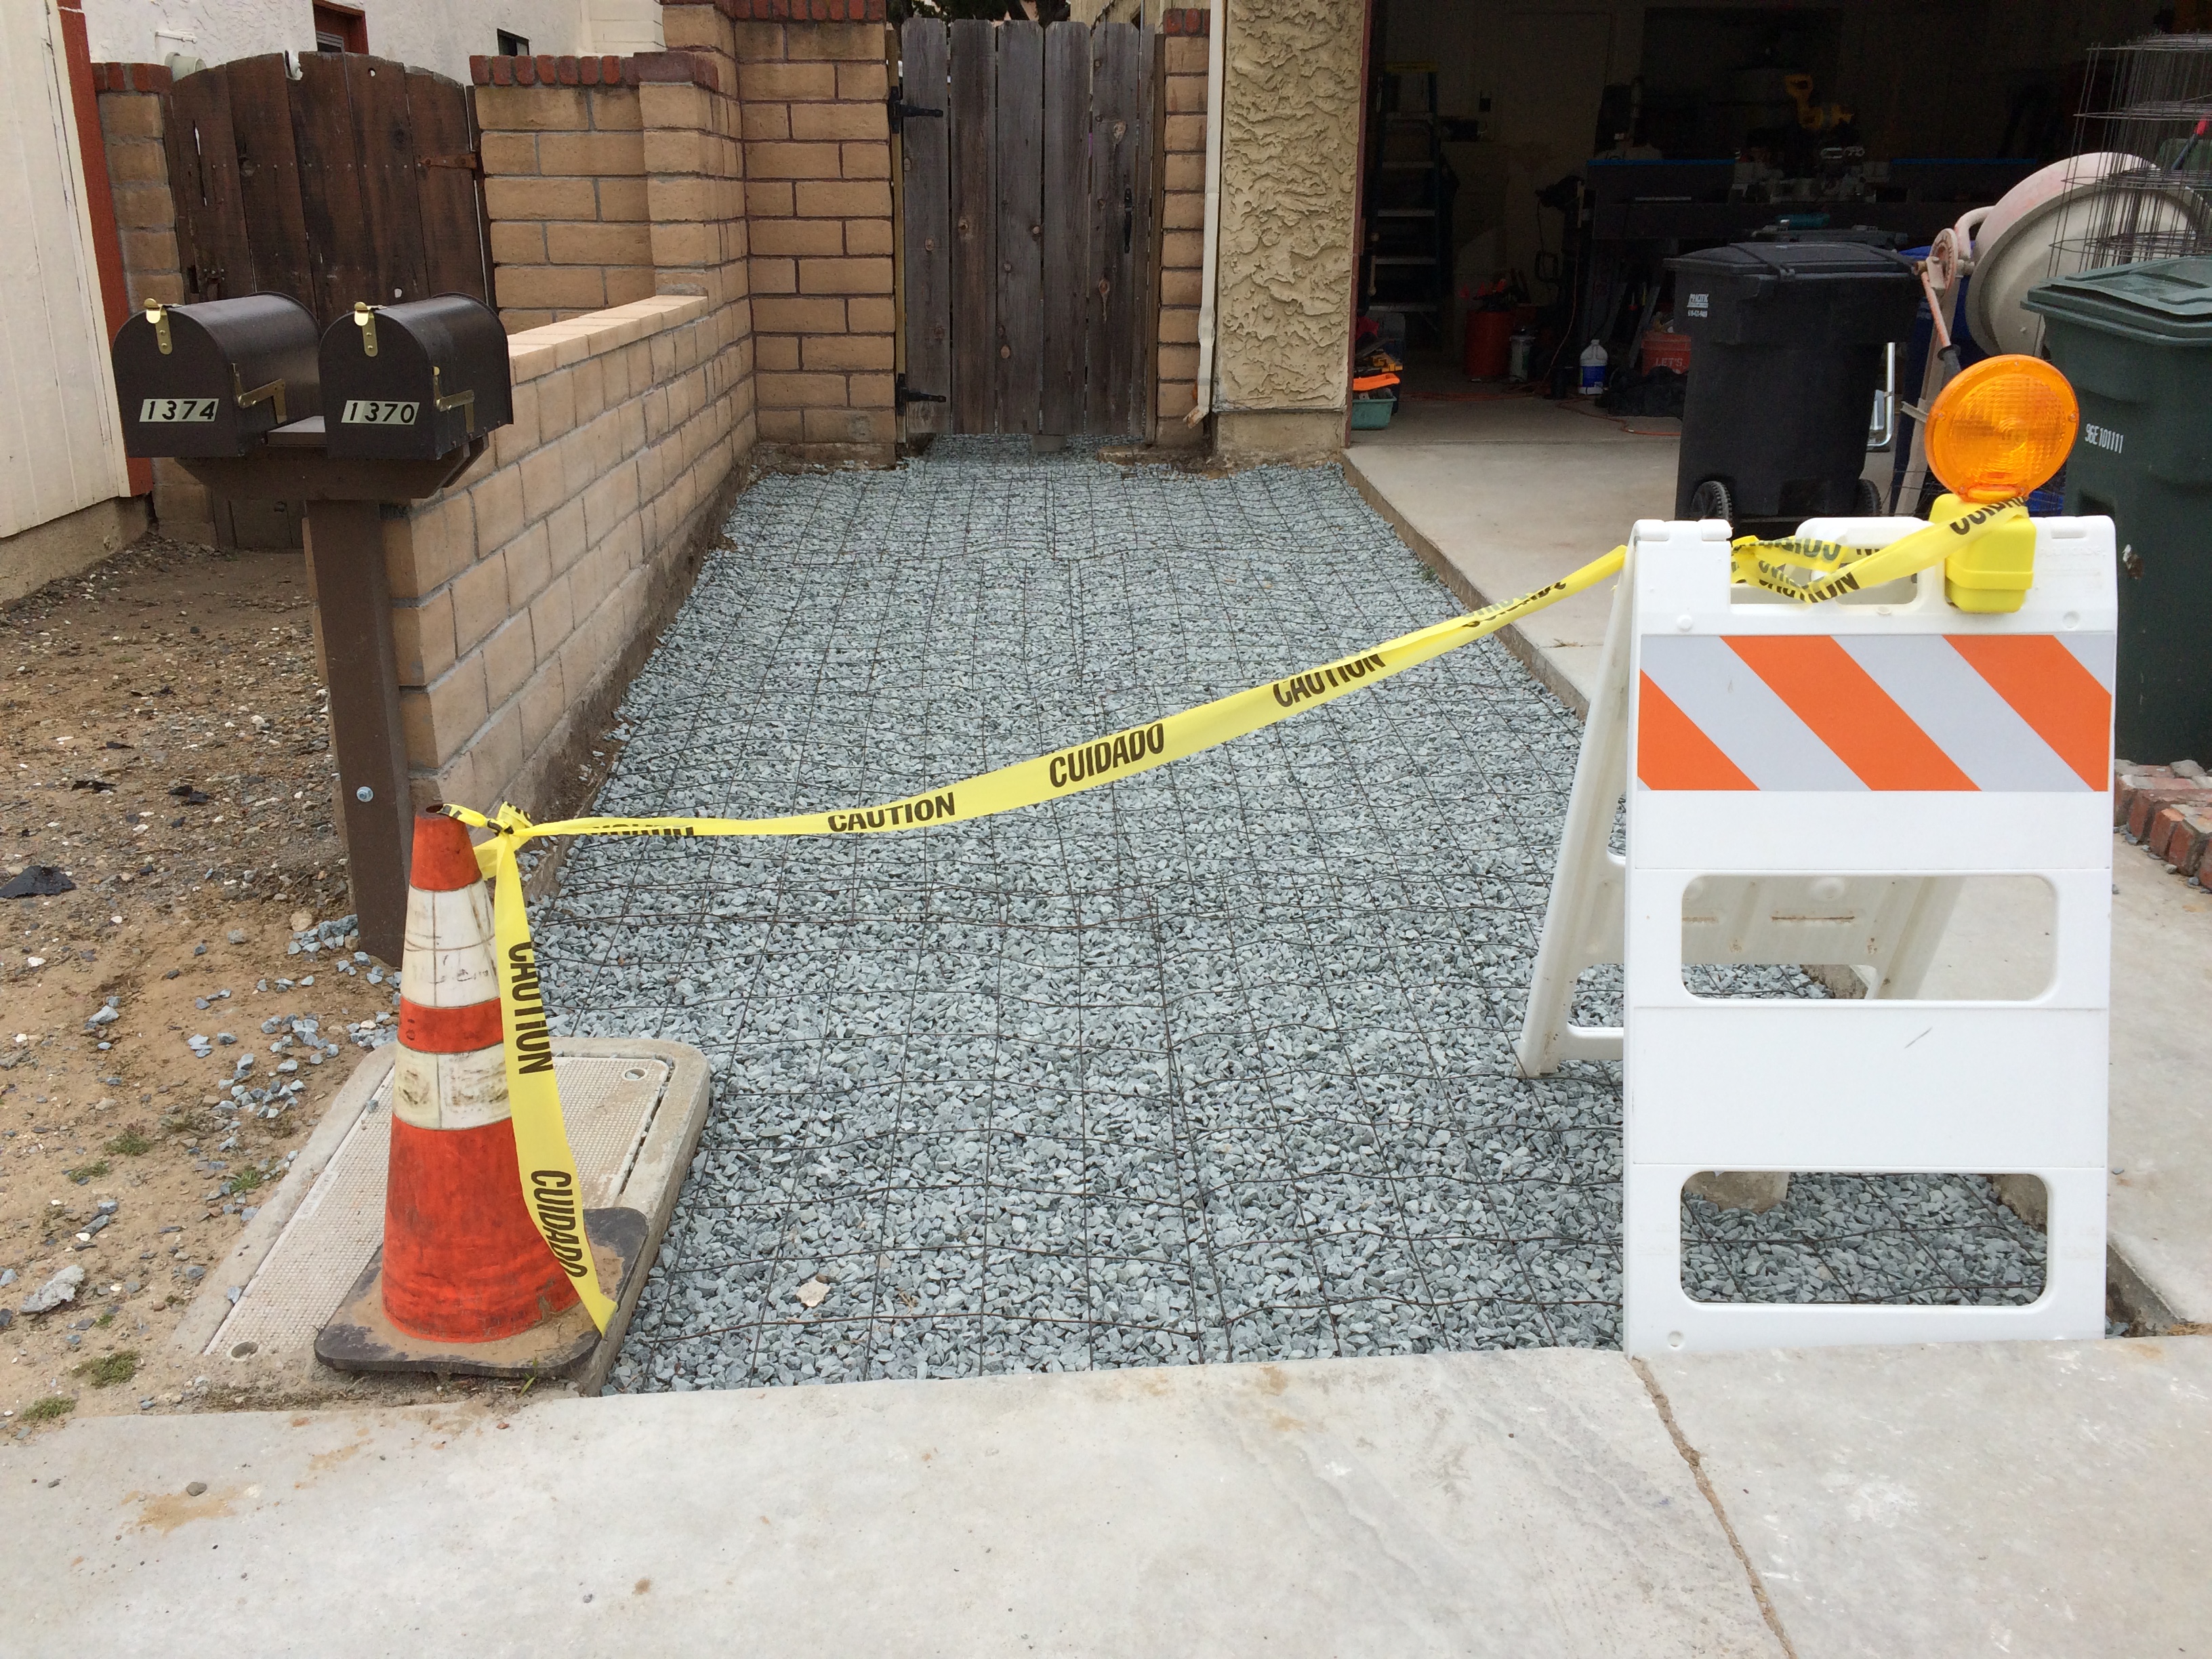
Service sidewalk all ready. I’m replacing the square grates with round ones on the advice of the subcontractor to minimize cracking.
Now everything was all set and the bids were in. It was time to choose a subcontractor. I chose a person who (a) provided a reasonable price (part of my day job is cost estimation, so I knew what the price range should be), and (b) would provide a schedule (e.g., meeting time, estimates), and stick to it. I believe the latter is a key indicator of future performance.
I’m meeting with the subcontractor tomorrow, and with luck, I’ll have the concrete poured by the end of the week. Wish me luck!
